
How to Remove Collar Stains from White Shirts Without Damaging the Fabric

White shirt collars pick up a lot more than most people realize. Sweat, body oil, deodorant, makeup, and everyday dirt can build up in the same narrow strip of fabric, which is why a shirt can look clean everywhere else and still have a yellow or gray ring around the neck.
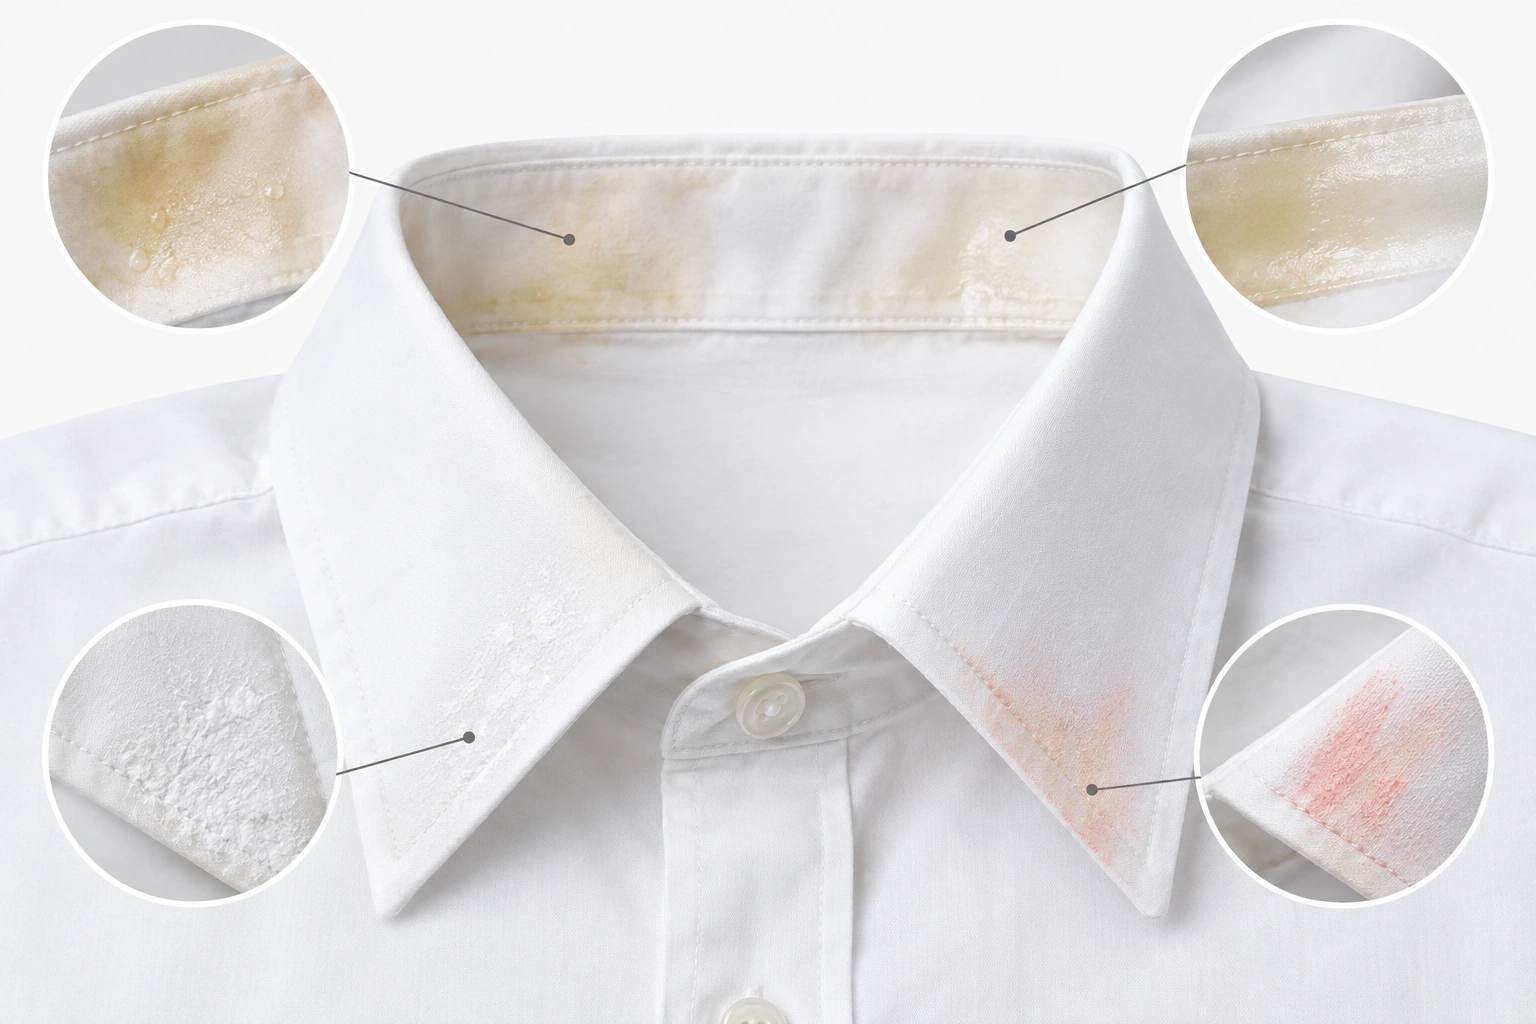
The good news: most collar stains can be reduced or removed at home if you treat them correctly and avoid the usual mistakes—especially heat drying too early and scrubbing like you’re trying to sand the stain off. If you wear white shirts often for work, travel, school, or events, the goal is not just to clean one shirt. It’s to use a method that protects the fabric so the collar stays wearable longer.
What Collar Stains Are Made Of
Collar stains are usually a mix, not a single stain.
Sweat and body oil
Sweat leaves moisture and salts behind, but the yellowing people notice often comes from body oils, or sebum, mixing with sweat and oxidizing over time. That’s why a collar can look darker after a few wears even if the shirt never touched food or mud.
Deodorant residue
Some deodorants leave a waxy or chalky buildup that clings to the fibers. That residue can trap oil and dirt, making the collar look gray or stiff. If the stain feels crusty or slightly raised, deodorant may be part of the problem.
Makeup and skin products
Foundation, sunscreen, hair products, and face powders can transfer onto the inside of a collar. These stains often look more beige, brown, or patchy than a classic sweat ring.
Dirt and mixed grime
Travel days, commuting, and crowded days add dust, pollution, and skin oils to the mix. A collar that looks “just dirty” is often a layered stain, which is why one quick wash sometimes fails.
Quick Decision Guide: What to Do First
If you want the safest fast answer, match the method to the stain type before you start.
- Sweat/body oil: start with a stain remover or enzyme detergent, then wash. If the collar feels greasy, add a little dish soap to the pre-treatment.
- Deodorant buildup: start with a gentle spot-scrub using stain remover or diluted detergent. If the residue is thick, let the product sit briefly before washing.
- Makeup: start with a degreasing pre-treatment such as dish soap or stain remover, then wash.
- Mixed grime or older yellowing: pre-treat first, then consider a soak if the fabric is white and care-label safe.
The practical takeaway is simpler than it sounds: oily buildup usually needs a degreasing or enzyme-based pre-treatment, while layered grime often needs pre-treatment plus a proper wash.
Before You Start: What You Need and What to Check
Before treating the shirt, check the care label. That label tells you whether the fabric can handle bleach, hot water, or gentler alternatives. Cotton whites are usually more forgiving than delicate fabrics or unknown blends, but the label should still make the call.
It also helps to identify the stain before you choose a method:
- Sweat/body oil: usually yellowing or gray, often on the inner collar edge
- Deodorant residue: chalky, crusty, or stiff buildup
- Makeup: beige, brown, or patchy transfer
- Mixed grime: dull, layered, or uneven dirt that doesn’t look like one single stain
Gather a few basics:
- Laundry pre-treatment spray or liquid stain remover
- Enzyme detergent or a strong laundry detergent
- A soft toothbrush or collar scrub brush
- Oxygen bleach for white, non-delicate fabrics
- Hydrogen peroxide for some spot treatments
- Mild dish soap for oily buildup
- A clean white cloth or towel
- A small bowl for mixing
Use caution with chemicals. Do not mix chlorine bleach with vinegar, ammonia, or other cleaners. If you use peroxide or any stronger treatment on a delicate or blended shirt, test it first on a hidden seam or inner hem. For travel or quick cleanup, a small hotel-sink treatment can work, but only if you can rinse and wash the shirt properly afterward.
A useful rule: if you are unsure whether the shirt can tolerate chlorine bleach, skip it and use oxygen bleach or a stain remover designed for whites instead. The American Cleaning Institute’s stain removal guide includes perspiration stains and notes that if dye remains, laundering again with sodium hypochlorite bleach may be used if it is safe for the fabric; for non-colorfast fabrics, it recommends soaking in oxygen bleach and then laundering. That safety check matters more than speed. You can read the guide at the American Cleaning Institute.
Fastest Safe Method for Fresh Collar Stains
If the stain is recent, the best move is to treat it before it sets.
For a fresh sweat/body oil or makeup stain, start with a light pre-treatment and a gentle spot-scrub. For a fresh deodorant-heavy collar, loosen the residue first, then wash.
- Lay the shirt flat and dampen the collar with cool or lukewarm water.
- Apply a small amount of stain remover, liquid detergent, or a degreasing mix to the stained area.
- If the stain is oily or makeup-based, work it in gently with your fingers or a soft toothbrush. Use light pressure; the goal is to lift residue, not rough up the fibers.
- If the stain is mostly deodorant buildup, let the treatment sit for a few minutes before lightly brushing it.
- Let it sit for about 5 to 10 minutes unless the product label says otherwise.
- Wash the shirt according to the care label.
- Air-dry the shirt first so you can inspect the collar in good light.
That last step matters. Heat can lock in a stain that is still present, which makes the collar much harder to rescue later. If the stain is faintly visible after washing, repeat treatment before putting the shirt in the dryer.
For a quick white-shirt stain workflow that overlaps with other common food and body stains, see our guide on how to remove stains from a white shirt and the more focused breakdown on how to remove oil stains from shirts.
How to Remove Set-In Collar Stains
Old collar grime usually needs more patience than force.
Set-in stains respond better to soaking and repeat treatment than to aggressive scrubbing. If the collar has been sitting for days or weeks, use this approach:
When to spot-scrub
Use spot-scrubbing when the stain is mostly on the surface, such as deodorant residue, fresh oil, or makeup transfer. Apply the cleaner directly to the collar and work it in gently with a soft brush or your fingers.
When to soak
Use a soak when the collar is older, yellowed, or clearly layered with sweat and grime. Soaking helps loosen buildup that has worked its way into the fibers. For white cotton or other bleach-safe fabrics, an oxygen bleach soak can be a good next step before washing.
Step-by-step for set-in stains
- Pre-wet the collar with cool water.
- Apply a stain remover or enzyme detergent directly to the stained band.
- Let it sit longer than a fresh stain—often 15 to 30 minutes, or as the label allows.
- If the stain is stubborn and the fabric is safe for soaking, use an oxygen bleach soak before washing.
- Wash normally.
- Air-dry and inspect.
- Repeat if needed.
If the first round does not fully work, one more gentle cycle is reasonable for many shirts. After that, it is usually smarter to switch methods rather than scrub harder. For example, a shirt that still looks oily after a detergent pre-treatment may do better with a degreasing spot treatment or an oxygen bleach soak, depending on the fabric.
Vanish’s shirts cuffs and collars instructions describe a paste-style method using powder and water, with careful rubbing and a limited wait time. That kind of measured approach can be useful for set-in buildup because it targets the stain without soaking the whole shirt. If you use a product like that, follow the current manufacturer directions on the Vanish cuffs and collars page and check that the method matches your fabric type.
Best Treatments by Stain Type
Different collar stains respond to different tactics. Here’s the quickest way to choose.
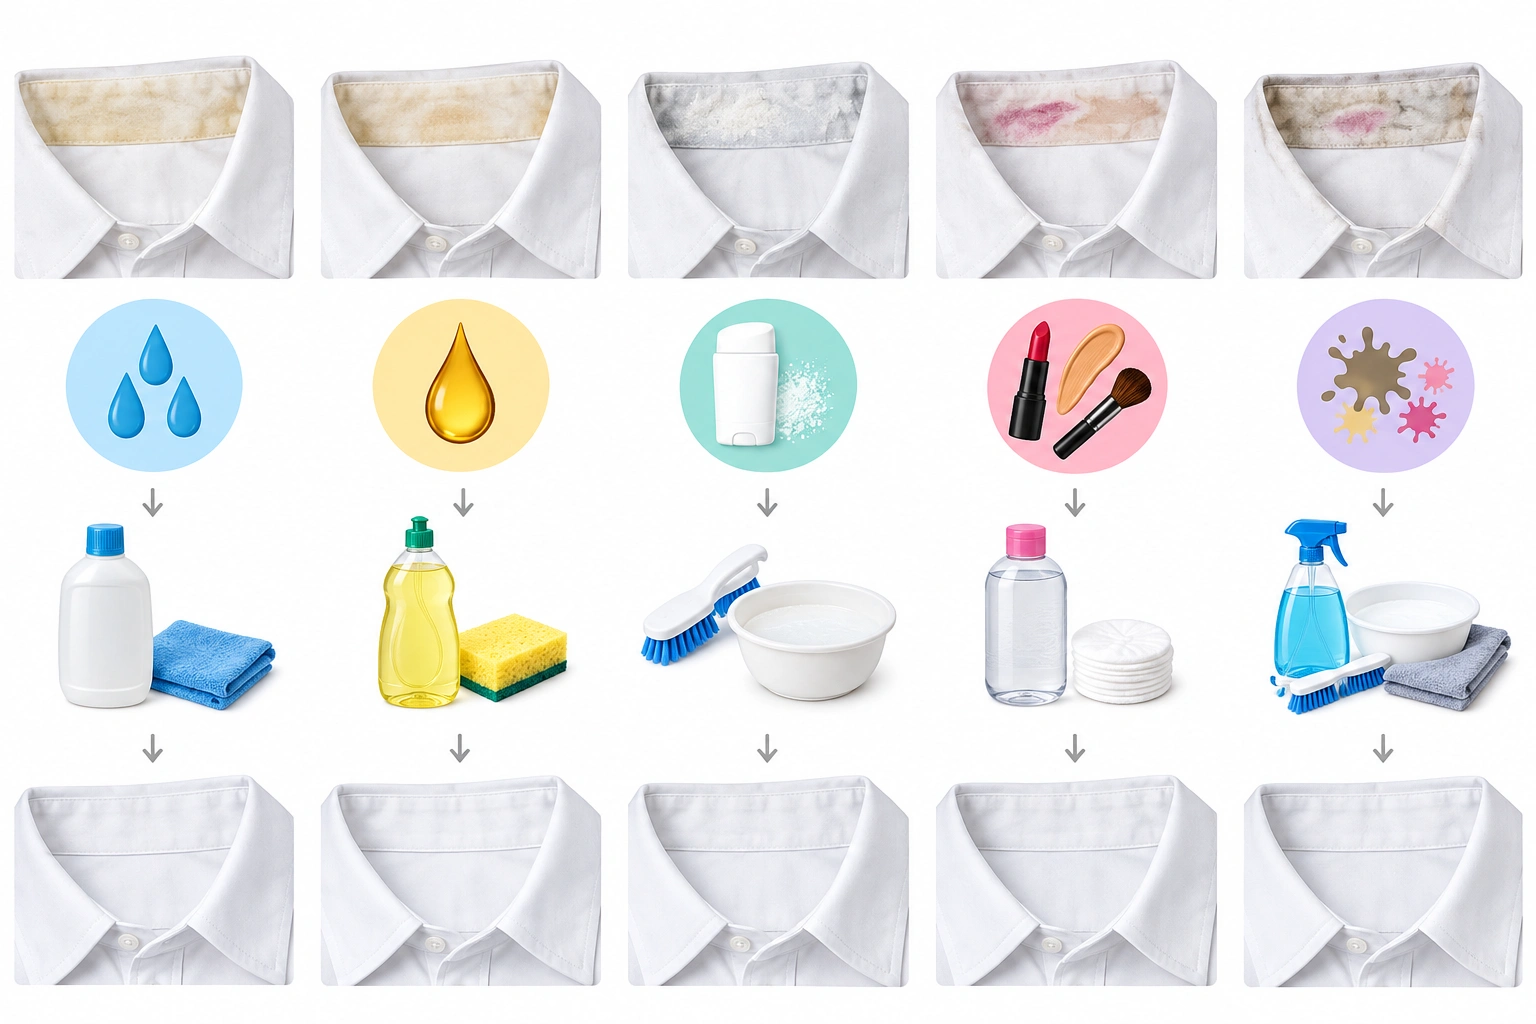
| Stain type | Best first treatment | Why it helps | Caution |
|---|---|---|---|
| Sweat + body oil | Enzyme detergent or stain remover spray | Helps break down organic buildup and grease | Don’t use high heat too early |
| Deodorant residue | Stain remover plus gentle brushing | Helps lift waxy or chalky buildup | Avoid hard scrubbing |
| Makeup transfer | Dish soap or stain remover | Helps cut through oils and pigments | Test delicate fabrics first |
| Mixed grime | Pre-treatment + wash + repeat if needed | Tackles layered buildup | May need two rounds |
| Old yellowing | Oxygen bleach soak on safe fabrics | Useful for white, non-colorfast garments | Check care label carefully |
For sweat and sebum, a product that handles both oils and organic residue usually works better than plain water or a normal wash. For makeup, the stain is often more cosmetic than biological, so a degreasing pre-treatment can do more than bleach alone.
If you want a practical comparison between stain types and methods, our article on how to remove stains from white clothes covers the broader decision-making that also applies to collar buildup.
Oxygen Bleach, Chlorine Bleach, or DIY Treatments?
This is where the trade-offs matter.
Oxygen bleach
Oxygen bleach is generally the safer first bleach option for white shirts that are bleach-safe, especially when you are dealing with a blended shirt or fabric that is not clearly suited to harsher treatment. It is slower than chlorine bleach, but it is also less likely to weaken fibers or cause yellowing.
Chlorine bleach
Chlorine bleach can whiten fast, but it is also the option most likely to damage fabric if overused or used on the wrong material. Use it only if the care label allows it and the shirt is truly bleach-safe. Even then, it is not the first choice for every collar stain.
Commercial stain remover sprays
These are convenient and often the easiest option for commuters and travelers. They are designed for spot treatment and save time when you need to treat the collar before a wash. The downside is that results vary by stain age and fabric.
DIY treatments
Hydrogen peroxide, dish soap, and baking soda are popular because they are inexpensive and easy to find. The Tie Bar suggests a hydrogen peroxide and dish soap mix for sweat stains; if you try a similar DIY approach, treat it as a tip to test carefully rather than a universal rule, and check the fabric first. White vinegar is sometimes used in laundry care, but it is not a universal stain remover and should never be mixed with bleach.
A simple decision rule: if the shirt is a workhorse cotton dress shirt and the care label allows it, you can usually try a stronger pre-treatment or oxygen bleach. If it is a delicate white blouse, a cotton blend, or a shirt with uncertain care instructions, start with the gentlest effective option and test first.
Step-by-Step: How to Wash and Dry the Shirt After Treatment
The wash cycle is where many good pre-treatments either succeed or fail.
- Treat the collar first, not after the shirt has been through the dryer.
- Wash the shirt on the warmest water the care label allows.
- Use a detergent that handles body oils well.
- If the label allows, add an oxygen bleach booster for white fabrics.
- Check the collar before drying.
- If any stain remains, repeat treatment and wash again.
- Air-dry until you are sure the stain is gone.
Air-drying first gives you a clear view of whether the stain is actually gone. A warm dryer can make a faint ring permanent-looking, even if a second treatment might have saved it.
If the shirt is part of a broader laundry problem—say, food splashes, oil marks, and collar grime all at once—our guide to how to remove stains from a white shirt is a good companion reference.
Common Mistakes That Make Collar Stains Worse
A few habits cause more damage than the stain itself.
- Drying too soon: Heat can set the stain.
- Using too much bleach: Strong bleach can weaken fabric and sometimes yellow it.
- Scrubbing aggressively: This can rough the collar and make it look worn before the stain is fully gone.
- Mixing cleaners: Bleach plus vinegar, ammonia, or other products is a bad idea.
- Treating blindly: Sweat, oil, and makeup do not always respond to the same method.
- Skipping a second treatment: Set-in grime often needs repetition, not force.
Think of collar care like repairing a zipper pull or a wheel bearing on luggage: the fastest fix is not always the safest one. Controlled, repeatable steps usually preserve the item longer.
Troubleshooting Stains That Won’t Come Out
If the stain is still there after one wash, use this decision path:
- If the shirt is white cotton and care-label safe: repeat treatment, then wash again.
- If the stain is oily: switch to a degreasing or enzyme-based pre-treatment.
- If the stain is yellowed and older: try an oxygen bleach soak before rewashing.
- If the fabric is delicate or blended: stop escalating and use a gentler product.
- If the collar still looks dingy after two careful rounds: consider professional cleaning.
The American Cleaning Institute notes that some stains may be prevented by proper sorting and laundering procedures. That is especially relevant for collars, because letting a shirt sit in a hamper for a week gives oils more time to oxidize and bond with the fibers.
How to Prevent Collar Stains from Coming Back
Prevention is mostly about reducing buildup before it becomes visible.
- Wash white shirts sooner rather than later after wearing them.
- Pre-treat the collar before each wash if you wear the shirt often.
- Use deodorants and skin products that leave less residue when possible.
- Avoid overapplying lotions or sunscreen near the neckline.
- Rotate shirts so one collar is not taking all the wear.
- For frequent travelers, keep a small stain remover in your toiletry kit so you can treat the collar before packing the shirt away.
- Use removable collar guards or shirt protectors when you know you will be wearing a white shirt for a long day.
- Let deodorant and skincare dry fully before putting on the shirt so less product transfers to the fabric.
- Hang shirts after wearing so the collar can air out instead of sitting folded and damp.
If a shirt is a frequent rotation piece, a quick collar pre-treatment every few wears can save you from the deep-clean cycle later. That is less about perfection and more about keeping the fabric from building up layers you have to fight through later.
When to Stop Home Treatment and Use Professional Cleaning
If the stain is still visible after a couple of careful home attempts, it may be time to stop.
Professional cleaning is a better choice when:
- the collar stain is old, dark, or deeply set in
- the shirt is delicate, blended, or has uncertain care instructions
- the fabric is starting to thin, pill, or fray from repeated scrubbing
- you have already tried a safe wash, a repeat treatment, and an oxygen bleach option where appropriate
- the shirt is important enough that you do not want to risk fabric damage
A cleaner may also be the safer option if the collar has a special finish, decorative trim, or a fabric blend that reacts badly to home stain removal. When in doubt, it is better to stop before the collar weakens.
Quick Takeaway
For fresh collar stains, pre-treat, wash, and air-dry before using heat. For set-in grime, repeat gentle treatment and consider oxygen bleach on safe white fabrics. Match the method to the stain type, check the care label, and avoid the temptation to scrub harder than the fabric can handle.