
How to Fix a Torn Backpack Without Replacing the Bag

A torn backpack does not always mean the bag is done. In many cases, a careful repair can give it a second life, especially if the damage is on the body of the pack rather than a load-bearing strap or anchor point. The key is matching the repair to the material and the location of the tear.
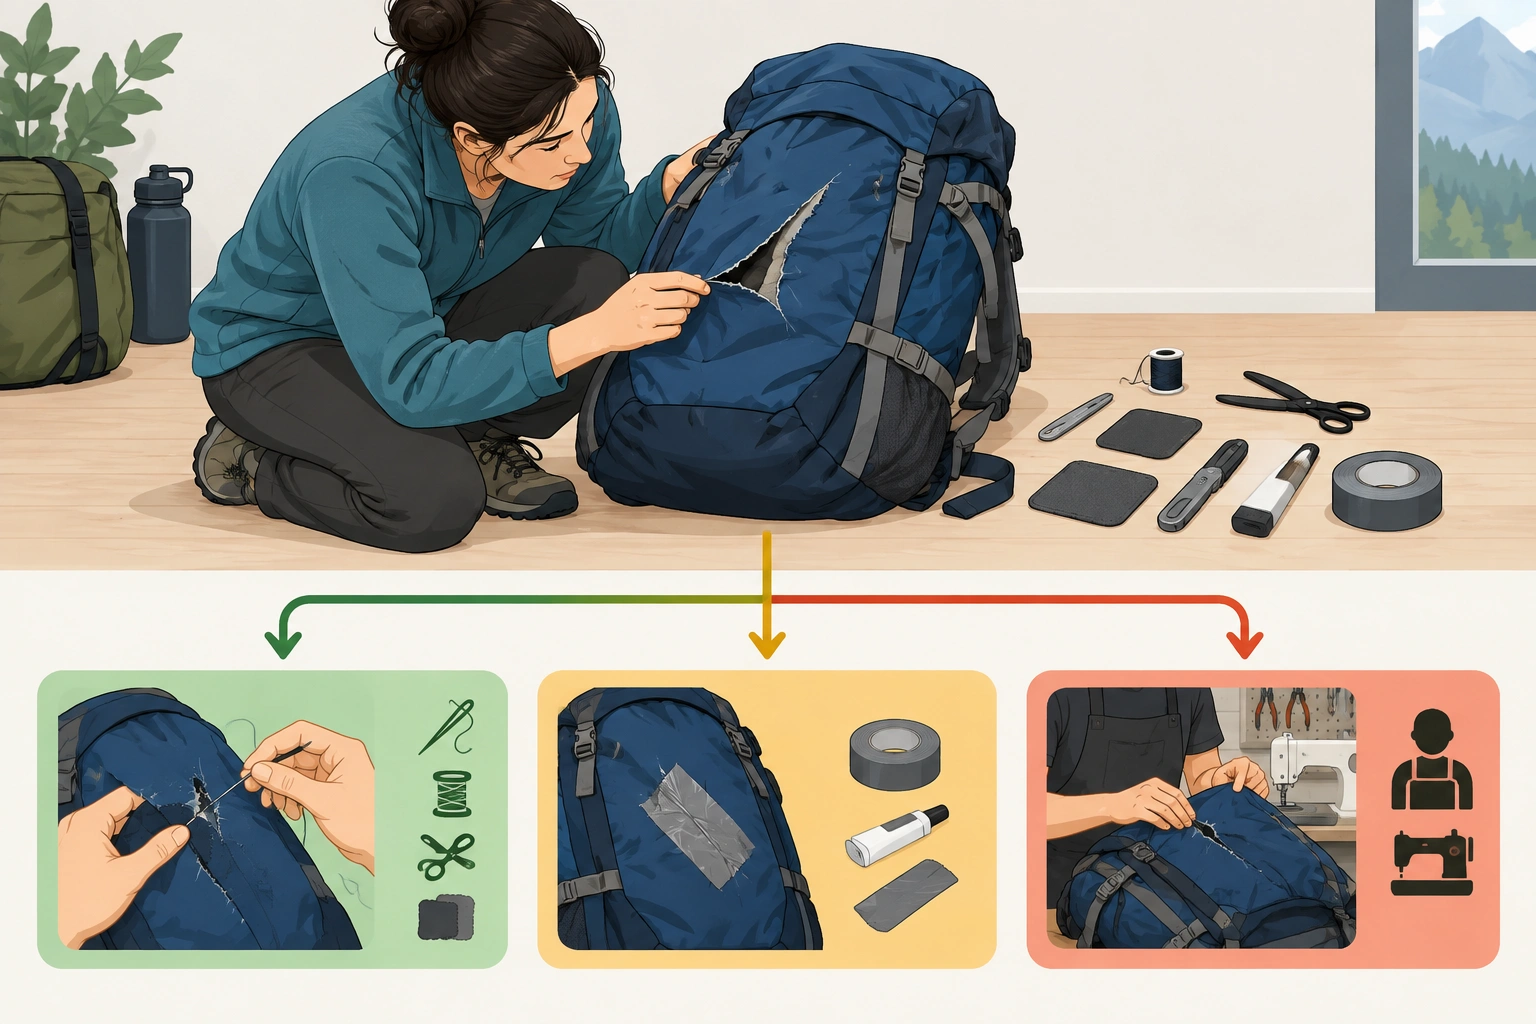
If you travel, commute, or carry school gear every day, the practical question is not just “Can I patch this?” It is “Can I patch this so it will hold up when the bag is loaded again?” That is where a lot of DIY repairs fail: they fix the visible hole but ignore the stress that caused it. A durable repair seals the tear, slows fraying, and reinforces the weak area so the damage does not reopen the first time the bag is full.
Can You Fix a Torn Backpack Yourself?
Yes, many torn backpacks are repairable at home. The best candidates are small to medium tears in the main fabric, a ripped lining, or a worn spot that has not reached a strap anchor, zipper track, or seam that carries weight.
Before you choose a method, use this quick decision checklist:
- Cosmetic tear: The damage is in the outer shell or lining, the edges are stable, and the tear does not affect a strap, zipper edge, pocket mouth, or seam that carries load.
- Structural tear: The damage is near a strap attachment, top handle, load-bearing seam, reinforced corner, or bar tack, or the fabric opens wider when the bag is lifted.
- Beyond DIY repair: The tear is spreading fast, the material is brittle or badly worn, or the repair would block hardware, disrupt the zipper path, or weaken the load path.
Here is the quick decision rule I use when a bag comes across the bench:
- DIY repair is usually reasonable if the tear is in the shell fabric, the edges are still intact, and the bag is not failing where it carries load.
- Temporary repair only makes sense if you need the bag for a trip, school day, or commute before you can do a stronger fix.
- Professional repair or replacement is the safer call if the tear is in a shoulder strap attachment, top grab handle, load-bearing seam, or any point that supports a heavy laptop, books, or travel load.
A useful comparison is this: a 2-inch tear in the side panel of a nylon backpack is often repairable with stitching and a patch. A similar tear at the base of a shoulder strap is a different problem because the fabric there is part of the structure, not just the shell.
For a nylon tear, the goal is to keep the damage from spreading and to support the area so it can handle normal use again. Nylon can unravel once the fibers are disturbed, which is why The Daily Sew’s backpack repair guide recommends sewing the rip or using hand stitches that cross the tear rather than relying on a weak surface fix.
If the bag is leather, the decision shifts. Leather tears usually do not fray like woven fabric, but they can split, stretch, or scar around the damage. Small splits in leather may be handled with adhesive repair or a leather patch, while larger tears, deep cracks, or damage near stress points are often better left to a professional. If you are working on leather, it helps to understand the material first; our guide on how to clean a leather backpack covers leather care basics that matter before any repair.
What You’ll Need to Repair a Torn Backpack
You do not need a full workshop, but you do need the right supplies for the repair method you choose.
Basic tools for most fabric repairs
- Heavy-duty needle
- Heavy-duty thread or upholstery thread
- Small scissors or snips
- Seam ripper, if you need to open a seam for better access
- Pins or clips
- Fabric patch material
- Fabric glue or repair tape for certain quick fixes
- Rubbing alcohol or a damp cloth for cleaning the repair area
- Optional thimble for hand sewing thicker fabric
What to use by material
- Nylon or polyester: heavy-duty thread, patch fabric, repair tape, and sometimes adhesive-backed patches
- Canvas: stronger thread, woven fabric patch, and hand sewing or machine sewing
- Leather: leather repair products, adhesive patching for small splits, or a specialist repair service for larger damage
- Mesh: fine needle, thread, and a reinforcing patch if the damage is minor; severe mesh damage often needs panel replacement
- Coated or reinforced fabric: low-profile stitching and a patch that does not interfere with the coating, reinforcements, or seam tape
A small but important detail: use thread that is stronger than the fabric you are repairing, not weaker. Thin all-purpose thread can hold for a while, but it is often the first thing to fail when the bag is loaded.
If the tear is near the inside of the bag, you may also want a clean work surface and a flashlight. Lining repairs are easier when you can see the back side of the damage clearly. For bags with grime inside, our guide to cleaning the inside of a backpack can help you prep the interior without making the tear worse.
Choose the Right Repair Method for the Tear and Material
The best fix depends on three things: fabric type, tear location, and whether the area carries weight.
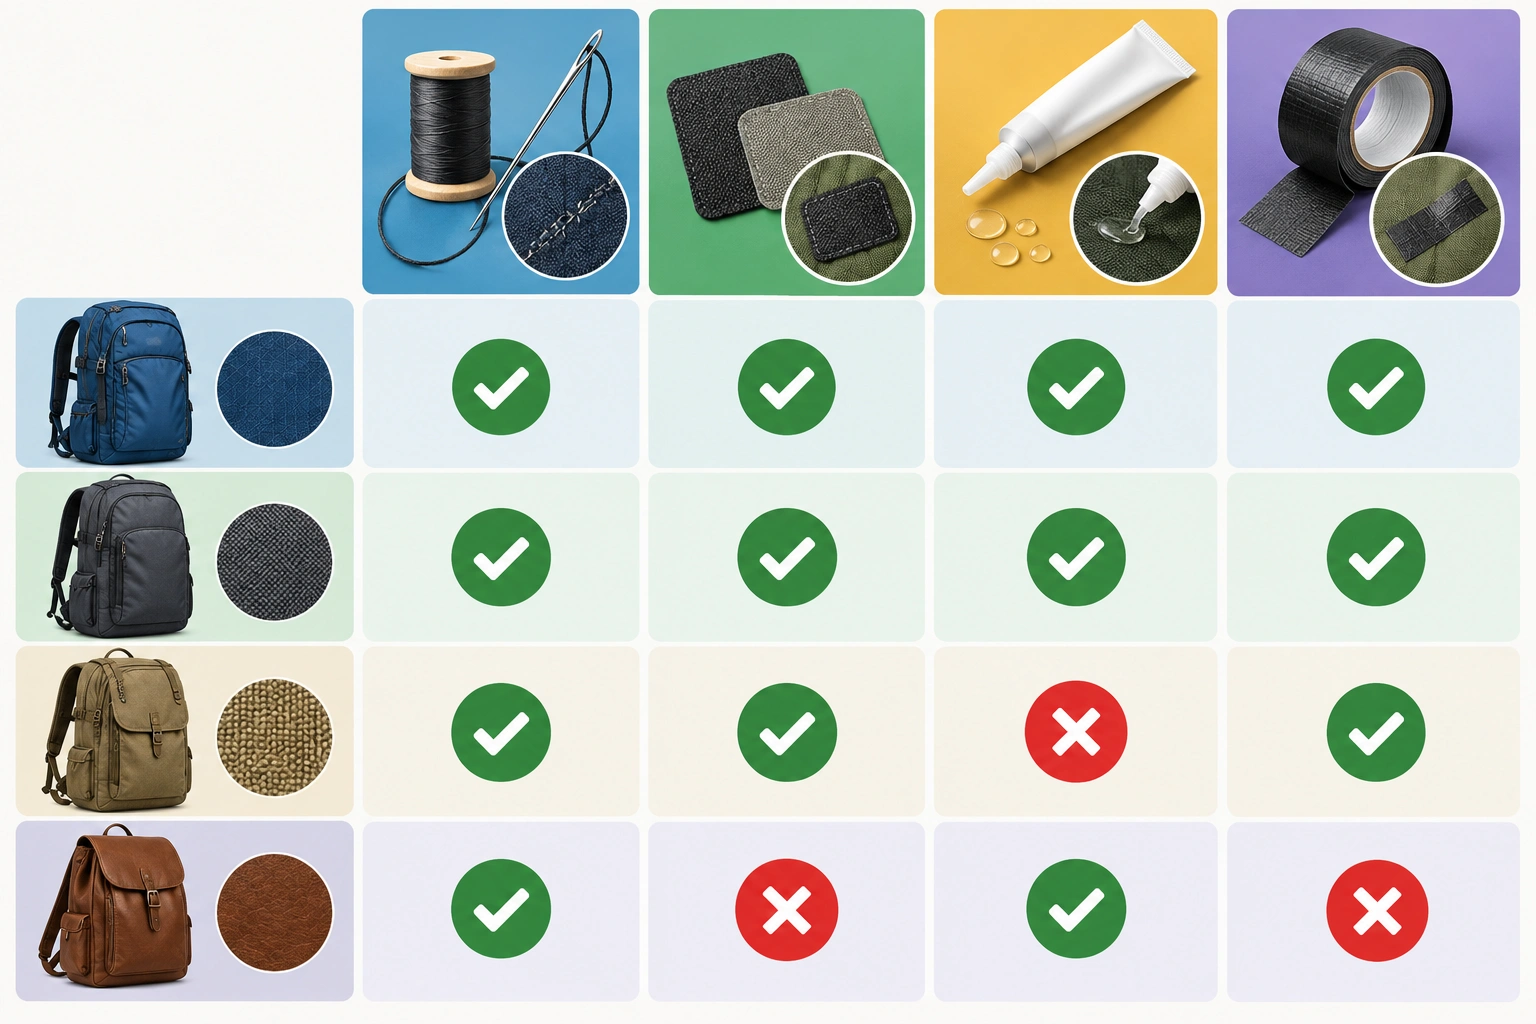
| Repair method | Best for | Strength | Appearance | Temporary or permanent |
|---|---|---|---|---|
| Hand sewing | Small tears in nylon, polyester, canvas, lining | Good if reinforced | Neat if done carefully | Permanent |
| Machine sewing | Straightforward fabric tears away from hardware | Strong | Cleanest finish | Permanent |
| Patch + stitching | Larger tears, fraying edges, visible holes | Very good | Can be discreet or visible | Permanent |
| Fabric glue | Small non-structural tears, edge stabilization, some leather repairs | Moderate | Clean, but not ideal for load areas | Usually permanent for light use |
| Repair tape / adhesive patch | Emergency fixes, travel, quick stabilization | Fair to moderate | Functional, not subtle | Temporary or semi-permanent |
Sewing vs. patching vs. glue
Sewing is usually the strongest option for woven backpack fabrics because it physically joins the torn edges. Patching adds another layer of support, which is useful when the hole is too large for stitches alone, when the fabric is thin, or when the tear sits in an area that gets regular use.
As a practical rule, sewing alone can be enough for a small tear in a non-structural panel if the edges meet cleanly and the fabric around it is still strong. Add a patch when the tear is larger, the fabric is fraying, or the area will see daily stress. For a backpack that gets regular commuting or school use, a patch is often the better choice when you want the repair to last.
Fabric glue can help stabilize a tear, but it is rarely the best single solution for a backpack that gets daily use. Glue works better as a support step than as the only repair, especially on high-stress areas.
Repair tape is the fastest option, and it is useful when you need the bag usable today. It is not the finish line. Think of it as buying time until you can sew or patch the tear properly.
Material-by-material guidance
- Nylon: usually best repaired with stitching plus a patch. The fabric can fray, so the repair should control the edges.
- Polyester: similar to nylon, though it may fray a little less aggressively depending on weave and coating.
- Canvas: often handles stitching well and can look tidy with a matching patch.
- Leather: small splits can sometimes be stabilized with leather adhesive or a leather repair patch, but tears near corners, straps, or seams often need professional repair because the material can stretch or deform around the damage.
- Mesh: small tears can sometimes be stitched carefully, but larger mesh damage often spreads and may need replacement of the panel.
- Coated or reinforced areas: keep reinforcement narrow and low-profile so you do not block waterproof coating, seam tape, or stitched reinforcements that help carry the load.
For a quick, practical starting point, RAB’s backpack repair guide recommends cleaning the damaged area first and using a patch sized appropriately for the tear, ideally a circle because rounded edges are less likely to lift. It also advises avoiding patches that cross seams. You can see that guidance in RAB’s repair instructions.
How to Prepare the Damaged Area
A repair lasts longer when the fabric is clean, flat, and not actively unraveling.
1. Clean the area
Wipe the area with a damp cloth first. If the fabric is synthetic and the dirt is stubborn, an alcohol wipe can help remove residue before patching. That matches the prep advice from NoSo Patches’ backpack repair guide, which recommends cleaning and removing loose threads before repair.
Do not soak the fabric. Too much moisture can make the area harder to stitch and can spread dirt into the tear.
2. Trim loose threads carefully
Cut away loose thread ends that are already detached, but do not enlarge the hole just to make it look neat. The goal is to remove dangling material that can catch and continue unraveling, not to carve the tear into a bigger opening. Instructables’ backpack repair guide makes the same practical point: trim torn-away threads, but do not remove more fabric than necessary.
3. Flatten the fabric
Lay the backpack flat and smooth the torn section so the edges line up naturally. If the tear is puckered or folded, the repair will often end up twisted and stressed.
4. Stabilize before stitching
If the tear is actively spreading, a small piece of repair tape can hold it in place long enough to stitch. That is especially useful on slippery synthetic fabric where the edges want to shift while you work.
Step-by-Step: How to Sew and Reinforce a Torn Backpack
This is the most reliable home repair for many fabric backpacks.
1. Align the tear edges
Bring the torn edges together without stretching the fabric. If the tear is jagged, do not force every tiny fiber into a perfect line. You want the fabric relaxed, not under tension.
2. Choose your stitch
For a durable hand repair, use a backstitch or tight hand stitches that cross the rip. For machine sewing, a zig-zag stitch is often a strong choice for nylon and similar fabrics because it helps bridge the tear and control fraying. That approach is also consistent with The Daily Sew’s repair guidance, which recommends a zig-zag stitch or hand stitches across the rip.
3. Sew beyond the tear
Do not stop exactly at the visible ends of the rip. Extend your stitching a little past the damaged area so the repair transitions into intact fabric. This reduces the chance that the tear will reopen at the ends.
4. Reinforce the weak point
If the fabric is thin or the tear happened because the area is stressed repeatedly, add a patch behind or over the stitch line. Keep the patch large enough to cover the damaged zone and the immediate weak area, but not so large that it interferes with nearby seams, zippers, or coated panels. Rounded patches can be easier to keep flat and may be less likely to catch than sharp corners.
5. Tie off and secure the ends
Finish the thread securely so the stitches cannot unravel. On synthetic materials, some repairers carefully seal thread ends with brief heat, but that should be done cautiously and only if the material and thread are suitable. If you are unsure, trim and knot instead of using heat.
6. Check the inside
If the tear goes through both layers, inspect the inside for loose threads or a second split. A repair that looks fine from the outside can still fail if the inner layer is damaged and left unsupported.
A note on machine sewing
Machine sewing is faster and often neater, but it is not always practical on a stuffed, curved backpack panel. Hand sewing takes longer, yet it gives you more control near seams, zippers, and corners. For many home repairs, hand sewing is the safer choice simply because it is easier to place stitches exactly where they are needed.
How to Repair Tears Near Seams, Straps, and Zippers
These are the areas where a backpack is most likely to fail again if the repair is too casual.
Near seams
If the tear is right beside a seam, avoid patching directly across the seam unless the seam itself is part of the damage and needs to be reopened and resewn. RAB specifically advises trying to avoid patching across seams. Seams create thickness and movement, and a patch that bridges them can lift or wrinkle.
If the seam is open, resew the seam first if possible, then reinforce the adjacent fabric panel with a patch that stays clear of the seam allowance. If you need access to the back side, use a seam ripper only enough to open the area you need, then close it again after the repair.
Near straps
A tear close to a strap anchor is a warning sign. This is not a cosmetic repair. If the strap is pulling through the fabric, the bag needs reinforcement that spreads the load, not just a neat cover-up.
If the damage is just beside a strap but not in the anchor itself, reinforce the surrounding panel without stitching through the strap webbing or blocking the stitch path that carries the load. In practice, that means reinforcing the fabric around the attachment point, not the strap hardware itself. If the tear gets worse when you lift the bag by that strap, the area is structural. That is the point where a repair specialist is often the better option.
Near zippers
A zipper-adjacent tear needs careful stitching so you do not interfere with the zipper track. Keep stitches clear of the zipper teeth and slider path. If the tear has caused the fabric to bunch into the zipper, fix the fabric tension before using the zipper again.
If the tear is beside the zipper tape, reinforce the fabric edge without stitching through the moving parts or building a thick patch that blocks the slider. For zipper-specific damage, our guide on how to fix a broken suitcase zipper can also help you think through hardware-adjacent repairs, even though backpack zipper construction may differ.
Load-bearing seams and bar tacks
If you see a bar tack or reinforced stitch cluster that has failed, treat that as a structural issue. A bar tack is there to handle stress. Once it starts pulling apart, the bag is telling you the load path is compromised. In that case, a simple patch over the top is usually not enough.
How to Fix an Inner Lining Tear
A torn lining is often much easier to repair than a torn outer shell.
If the outside of the backpack is intact, you can usually repair the lining from inside the bag without changing the look of the exterior. The main goal is to stop the lining from snagging on contents or widening into a larger split.
Best approach for lining damage
- Small tear in a plain lining panel: hand stitch it closed with fine, durable thread
- Larger tear in a non-structural lining area: add a light patch on the inside of the lining
- Frayed lining edge: trim loose threads first, then stitch or patch
- Tear near a pocket mouth or zipper edge: reinforce it more carefully, because those edges open and close repeatedly and can turn a minor split into a functional failure
A lining tear is mostly cosmetic when it sits in a flat interior panel and does not affect how the bag opens or holds items. It becomes more important when it reaches a pocket mouth, zipper edge, or any opening that gets pulled every time you use the bag. In those areas, a simple stitch may not last unless you reinforce the edge.
Temporary Fixes for Travel or Daily Commutes
If you need the bag usable today, a temporary fix is better than letting the tear spread.
Repair tape
Repair tape works well as a stopgap on many synthetic fabrics. Clean the area first, press the tape down firmly, and round the corners if you trim the patch yourself. Rounded edges can be less likely to catch and peel.
Adhesive patch
Adhesive patches can be useful on nylon or similar fabrics when you need a fast seal. They are not a substitute for stitching on a heavily loaded bag, but they can keep a tear from growing until you can do a proper repair.
What temporary fixes are good for
- A commute bag that only needs to last a few days
- A travel backpack you need to get through one trip
- A small tear that is not near a strap or anchor point
What temporary fixes are not good for
- A strap attachment failure
- A tear that opens when the bag is lifted
- A hole near a zipper that catches every time you use it
- A backpack carrying a laptop or heavy books through the damaged area
How to Test the Repair Before You Trust It
A repair is only useful if it survives real use.
Check the stitch line
Gently pull the fabric on both sides of the repair. You are looking for movement, not trying to tear it open. If the stitches shift or the patch lifts, the repair needs reinforcement.
Load it gradually
Put a light load in the backpack first, then add more weight in stages. Start with about the kind of load you would use for a short errand, then move up toward your normal carry if the repair stays stable. A repair that holds under a few books may still fail once the bag is packed for school, work, or travel.
Watch the edges
The most common failure point is not the center of the repair. It is the edge where stitched fabric meets unstressed fabric. If the repair starts to curl, fray, or separate there, reinforce that border before using the bag heavily.
Signs the repair is not safe for daily use
- The tear opens when you pick up the bag
- The stitches pucker or cut into the fabric
- The patch lifts at the edges
- The zipper catches on the repaired area
- The seam or strap area starts to distort under a normal load
Common Mistakes to Avoid When Fixing a Torn Backpack
A few repair mistakes cause most repeat failures.
- Using weak thread on a heavy-use backpack
- Skipping cleaning and stitching over dirt or grit
- Patching across seams when the seam itself is the weak point
- Repairing a strap anchor as if it were a cosmetic tear
- Sewing too close to the edge of frayed fabric and creating more damage
- Relying on tape alone for a bag that carries daily weight
- Testing the repair only when the backpack is empty
The biggest mistake is treating every tear the same. A small side rip and a failed strap anchor are not comparable problems.
When to Replace the Backpack Instead of Repairing It
Sometimes repair is possible but not worth trusting.
Replace the bag, or have it professionally repaired, if:
- The tear is in a load-bearing strap or seam and the fabric is badly weakened
- The damage is too large for a patch to cover cleanly
- The material is cracking, brittle, or failing in multiple places
- The repair would interfere with a zipper, buckle, or other hardware
- The backpack is already worn out in several areas, not just one
That last point matters. A single tear on an otherwise solid bag is a repair. Multiple failures across the pack suggest the material has reached the end of its useful life.
When to See a Luggage Repair Specialist
If the tear is at a strap anchor, the top handle, a load-bearing seam, or a structurally important corner, a specialist can often reinforce it more safely than a home repair can. That is especially true for travel backpacks, leather packs, and bags that carry laptops or heavy daily loads.
A repair shop can also help when the tear is close to hardware, when the fabric is coated or waterproofed, or when the bag needs a cleaner finish than a patch-and-stitch job can provide. If the bag is worth keeping, professional reinforcement is often cheaper than replacing a quality pack.
FAQs
Can I fix a torn backpack without sewing?
Sometimes. Repair tape or adhesive patches can hold a small tear temporarily, and adhesive repair may work on some materials. But if the bag carries real weight, sewing is usually the more dependable fix.
What is the best repair for nylon?
For nylon, a stitched repair plus a patch is usually the strongest home option. Nylon can fray once torn, so controlling the edges matters as much as closing the hole.
Can I repair a tear near the strap?
Only if the damage is minor and not part of the load-bearing attachment. If the strap is pulling on the torn area, that is a structural failure and should be reinforced properly or handled by a repair specialist.
Is a patch better than glue?
For daily-use backpacks, a patch is usually stronger. Glue can help stabilize the area, but it rarely beats a stitched repair for durability.
What if only the lining is torn?
That is usually a straightforward repair. Stitch the lining closed or add a small inside patch so the tear does not catch on contents. If the tear reaches a pocket mouth or zipper edge, reinforce it more carefully.
Will a DIY repair hold up for school or commuting?
It can, if the tear is in non-structural fabric and you reinforce it well. If the damage is near a strap, seam, or zipper, be more cautious and test the bag with a lighter load first.
Should I repair a canvas backpack the same way as nylon?
Not exactly. Canvas usually handles stitching well and can take a patch cleanly, while nylon often needs a little more attention to fraying control. The repair logic is similar, but the fabric behavior is different.
How do I know if the backpack is beyond repair?
If the tear keeps spreading, the bag has multiple weak spots, or the damage is in a load-bearing area that cannot be reinforced safely, replacement is the wiser choice.