
How to Repair a Backpack Seam Without Making the Tear Worse

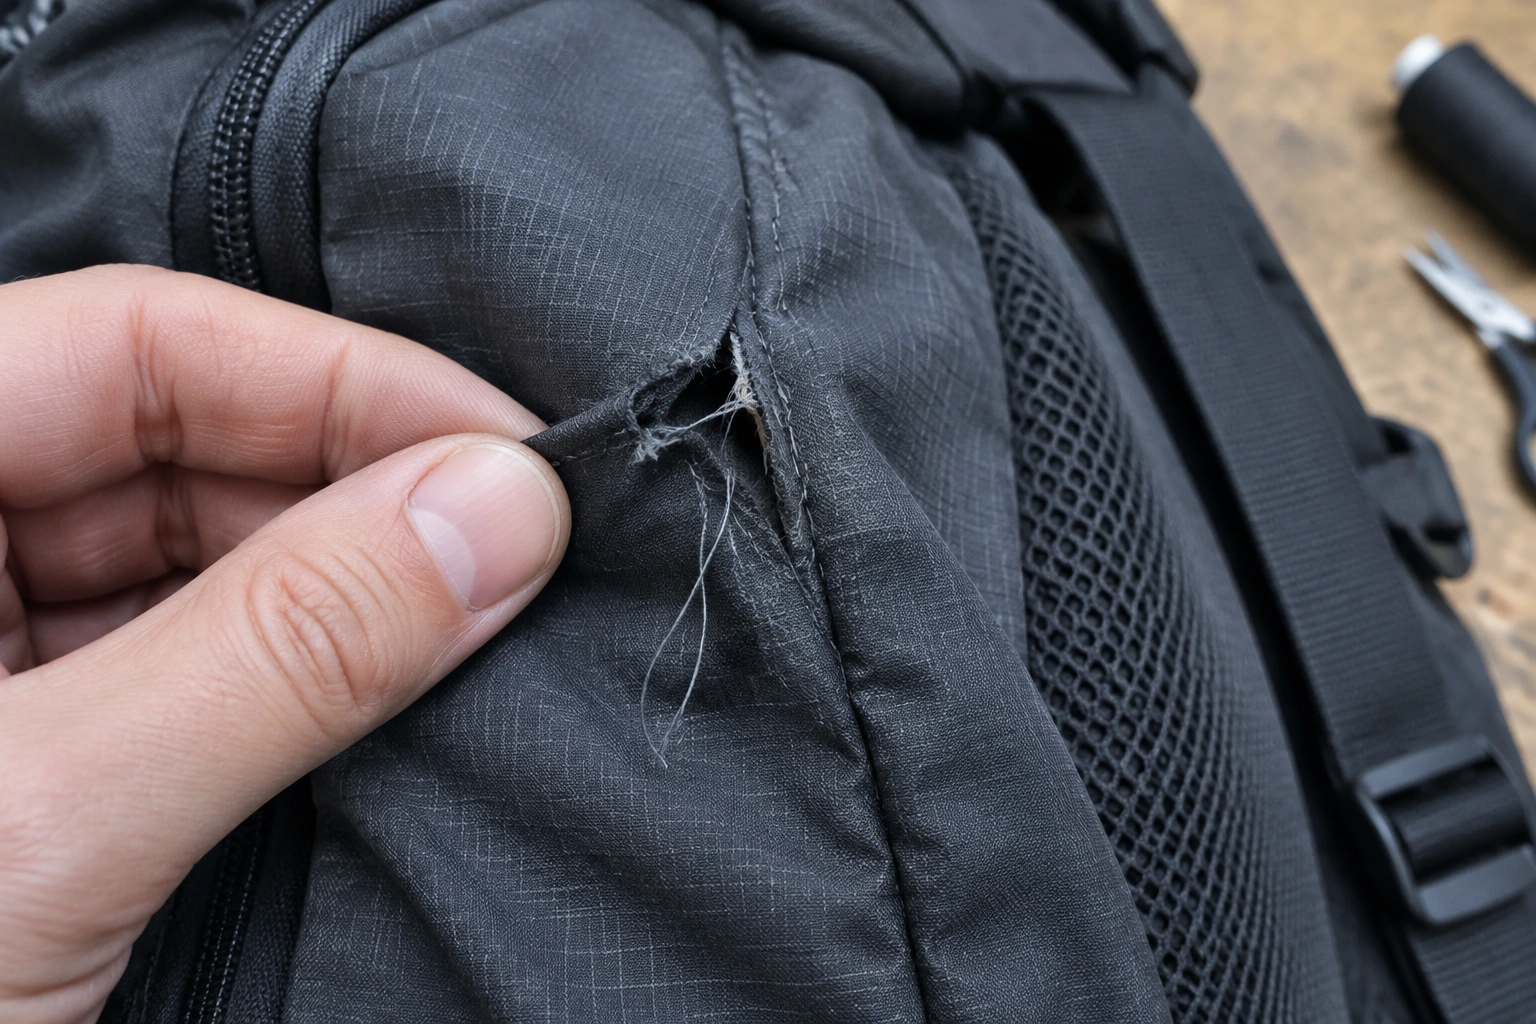
A split backpack seam looks minor right up until it starts opening wider every time you load the bag. I see that a lot with commuters, students, and parents: a few loose stitches turn into a seam that lets the whole side panel sag. The good news is that many backpack seams can be repaired at home if the fabric around the tear is still sound and the seam is not carrying a critical load.
The trick is choosing the right repair for the damage in front of you. A small split on a side seam is very different from a seam near a strap anchor or a top corner that holds the weight of the bag. If you treat both the same, the repair often fails quickly. If you match the method to the stress level, you can usually get the bag back into everyday use.
If you want to clean the bag before repairing it, these guides can help with the prep work: how to clean a polyester backpack and how to clean the inside of a backpack.
Can You Repair a Backpack Seam Yourself?
Yes, often you can — but not every seam is a good DIY candidate.
Use this quick decision flow before you start:
-
Is the seam cosmetic or low-stress?
If it is a small split on a side panel, pocket edge, or similar area, DIY repair is usually reasonable. -
Is the seam structural or load-bearing?
If it sits near a shoulder strap, top handle, bottom corner, or compression point, treat it as higher risk. -
Is the fabric still strong around the tear?
If the fabric is firm and the opening is clean, stitching is more likely to hold. If the edge is frayed, thin, or torn beyond the stitch line, plan on reinforcement or a patch. -
How much weight does that area carry?
A seam that only closes a pocket is different from one that supports a full school or travel load. -
Can you reach it without forcing the bag?
If the seam is too bulky, thick, or awkward for your tools, a repair shop may be the safer choice.
A seam is usually worth repairing at home when:
– the fabric is still mostly intact
– the opening is small to moderate
– the seam is in a low- or medium-stress area
– the backpack only needs to be reliable for everyday use, not restored to factory condition
A seam is more likely to need a repair shop when:
– the tear is at a strap attachment point
– the fabric around the seam is thin, shredded, or badly frayed
– the seam carries heavy daily loads, like laptops, books, or travel gear
– the bag is waterproof and the seam needs to stay sealed after the repair
– the area is too thick or bulky to sew cleanly at home
Think in three categories:
Cosmetic seam failure: a few stitches have popped, but the fabric is still strong. This is usually the easiest fix.
Structural seam failure: the seam has opened and the edge is no longer held together. This needs real stitching, not just tape or glue.
Load-bearing failure: the seam helps support weight, like a shoulder strap junction or top handle area. These repairs need extra care, and sometimes professional reinforcement is the safer call.
A useful rule: if you can pinch the damaged area and the fabric feels firm, repair is more realistic. If the fabric feels soft, thin, or torn beyond the stitch line, you may need a patch or a specialist.
Tools and Materials You’ll Need
For most backpack seam repairs, gather everything before you start. That keeps you from stretching the damage while hunting for tools.
Basic hand-repair kit
- heavy-duty thread, ideally polyester or nylon thread
- a strong needle, preferably one suited for thicker fabric
- small scissors or snips
- seam ripper or tweezers for loose threads
- pins or clips
- fabric patch material if the seam area is weakened
- seam sealer for finishing minor gaps on coated fabric, if appropriate
For machine sewing
- sewing machine capable of handling thicker fabric
- heavy-duty thread
- a strong universal or denim needle, depending on fabric thickness
- clips or pins
- patch material for reinforcement if needed
Practical choices that matter
- Match the thread color if appearance matters. For hidden repairs, durability matters more than color, but matching thread can make a repair less noticeable.
- Choose the needle for the fabric. A universal needle may work on lighter backpack fabric, while denim or heavy-duty needles are often better for thicker nylon, polyester, or layered seams.
- Use a patch only when the fabric needs support. If the seam is still strong and the fabric is intact, a patch may be unnecessary.
For outdoor-style seam products, seam sealant and repair patches can be useful on some fabrics, but they do not replace stitching when the seam is structural. They are best treated as reinforcement or finishing materials, not the main repair for a load-bearing seam.
Inspect the Seam and Identify the Damage
Before you sew anything, turn the bag inside out if you can. That gives you a clearer view of the seam allowance and makes it easier to see how far the opening runs.
Check four things:
1. Where the seam sits
A seam along a side panel is usually less stressed than one near:
– shoulder straps
– grab handles
– bottom corners
– zipper ends
– compression points
2. What the fabric is made of
Nylon and polyester are common backpack fabrics. Nylon can fray quickly once it starts tearing, so the goal is to stop the fraying before it spreads. Ripstop fabric can also unravel if the damaged area is left loose, even though the woven grid helps resist larger tears.
3. How much fabric is still holding
If the seam has simply opened, stitching may be enough. If the stitch holes have enlarged or the fabric edge is crumbling, plan on reinforcement.
4. Whether the damage is clean or messy
A clean split is easier to resew. A frayed opening with loose threads needs trimming and sometimes a patch before sewing.
A simple rule: sewing closes the seam, while a patch supports weak fabric. If the fabric is still strong, stitch directly. If the fabric is thin, torn, or fraying beyond the stitch line, add a patch before you sew or choose a repair shop if the area is load-bearing.
Choose the Best Repair Method for the Seam Type
Here’s the simplest decision rule:
- Use hand sewing when the seam is reachable, the damage is modest, and you need control in a tight area.
- Use a sewing machine when the seam is straight enough to feed through and the fabric can handle it.
- Add a patch before stitching when the fabric around the tear is thin, frayed, or torn beyond the original seam line.
- Use seam sealer or repair tape only as a finishing step for minor gaps, coated fabric, or waterproof finishing — not as the sole fix for a structural seam.
- Use a patch instead of direct stitching when stitching alone would pull through weakened fabric or when the tear has widened into the panel.
Comparison table
| Repair method | Best for | Strength | Difficulty | Trade-off |
|---|---|---|---|---|
| Hand sewing | Small splits, tight corners, strap-adjacent areas | Moderate to good | Low to moderate | Slower, but more controlled |
| Sewing machine | Accessible seams on nylon or polyester | Good to strong | Moderate | Faster and often neater, but harder in cramped spots |
| Patch reinforcement | Thin, frayed, or weakened fabric | Good when paired with stitching | Moderate | Adds bulk, but helps prevent repeat failure |
| Seam sealer / repair tape | Minor gaps, coated fabric, waterproof finishing | Low to moderate alone | Low | Useful for finishing, not enough for major seam failure |
If the seam is under load, I would rather see a slightly bulky repair than a neat one that fails early. Durability matters more than appearance.
Prepare the Area Before Repairing
This part is boring, but it saves repairs.
- Empty the bag completely. Any weight inside pulls on the seam while you work.
- Clean the area. Dirt, oils, and grit make stitching harder and can keep adhesive or seam sealant from bonding properly.
- Trim loose threads. Snip only the frayed ends that are already free. Do not cut into the intact seam line.
- Align the torn edges. Bring the seam back to its original position before sewing.
- Clip or pin the layers. This keeps the fabric from shifting while you stitch.
If the fabric has started to fray badly, a small patch on the inside can give the seam something stronger to bite into. That matters most on thin nylon and polyester panels that have already been stressed by overpacking.
How to Hand-Sew a Backpack Seam
Hand sewing is the most practical repair when the seam is awkward to reach or when the bag is too bulky for a machine.
Step 1: Thread a strong needle
Use heavy-duty thread if you have it. Regular thread can work for very light use, but it is not my first choice for a backpack that will carry books or travel gear.
Step 2: Anchor the first stitches
Tie a secure knot at the end of the thread. Start just inside the intact seam allowance so the knot is hidden and protected.
Step 3: Use a backstitch
A backstitch is a strong hand stitch for this kind of repair because each new stitch overlaps the previous one. That helps resist unraveling if the seam gets pulled again.
Work slowly and keep the stitches close together. Aim for even spacing so the repair line stays consistent, and keep the seam allowance aligned as you sew. If you sew too far from the original line, the repair can distort the bag shape or leave weak fabric outside the stitch line.

Step 4: Follow the original seam line
Sew just inside the original stitch path if possible. If the seam allowance is exposed, use enough overlap to catch solid fabric on both sides of the opening, but do not wander so far inward that you change the fit of the panel.
Step 5: Reinforce the ends
The beginning and end of the repair are common failure points. Go back over the last few stitches or add a short bartack-like cluster of tight stitches at each end.
Step 6: Secure the thread
Tie off the thread firmly and trim the tail close to the knot.
For a simple side seam, hand sewing can be enough. For a seam near a strap or corner, I would usually add reinforcement after stitching.
How to Repair a Backpack Seam with a Sewing Machine
A sewing machine can produce a stronger, more consistent repair if the seam is accessible and the fabric feeds well.
Use this method when:
– the torn seam is straight or gently curved
– the fabric is not too thick for your machine
– you can reach the repair without forcing the bag through the machine
Some backpacks are too bulky, layered, or stiff for a home sewing machine. If you have to push or drag the bag through the machine, stop. Forcing thick seams can damage the machine, break needles, or distort the backpack.
Machine repair steps
- Turn the backpack so the seam sits flat.
- Pin or clip the seam back into position.
- Use a strong needle and heavy-duty thread.
- Sew slowly along the original seam line.
- Backstitch at the start and end.
- If the area is stressed, sew a second line just inside the first line or add a short reinforced section.
A zig-zag stitch can help on some nylon repairs because it gives the seam a little flexibility, but I would still treat stitch choice as secondary to proper reinforcement and placement. On a load-bearing seam, a straight reinforced line or bartack-style reinforcement is often more useful than a decorative stitch pattern.
How to Reinforce the Repair for Long-Term Durability
This is where many DIY repairs fall short. The seam may close, but the surrounding fabric may still be weak.
Use a patch when the fabric is thin
If the seam edge has started to tear out, place a patch behind the damaged area before or after sewing. A patch spreads the load over a wider area, which helps prevent the stitches from pulling through the fabric again.
For a plain seam split with intact fabric, a patch is optional. For a frayed tear, a patch is often the difference between a repair that holds and one that opens again.
Add bartacks at stress points
A bartack is a tight, dense set of stitches used to reinforce areas that get repeated stress. You’ll often see this near straps and pocket openings. If your machine can do it, or if you can mimic it by hand with dense stitching, it can strengthen the ends of a repair.
Use seam sealer carefully
Seam sealer is useful for finishing minor gaps or helping a coated fabric resist moisture around the repaired area. It is not a substitute for stitching on a structural seam. On waterproof or coated backpacks, check the product directions and let it cure fully before use.
Special Cases: Straps, Corners, and Zipper Areas
Strap attachment points
If a seam is connected to a strap, treat it as load-bearing. A simple resew may hold for light use, but it may not be enough for a bag that carries a laptop and books every day. Strap-anchor failures are often not suitable for simple home repair unless the surrounding fabric is still robust. These repairs usually need patch reinforcement and dense stitching, and some are better handled by a repair specialist.
Top handles
Top handles also carry repeated lifting force. If the seam near the handle has opened, check whether the surrounding fabric is still thick and firm. If the fabric is soft, frayed, or pulled out around the stitch line, stop DIY and look for professional repair.
Bottom corners
Corners take repeated abrasion from floors, car trunks, and baggage handling. If the seam is opening there, check whether the fabric is worn through as well. A patch is often more useful than stitching alone.
Near zippers
Zipper-adjacent seams are tricky because you must avoid sewing into the zipper tape or changing the zipper path. Use short, careful stitches and stop before you interfere with the zipper function. If the seam is too close to the zipper teeth or tape, a machine may be too risky.
Common Mistakes to Avoid
A few mistakes show up again and again:
- using weak thread that snaps under load
- sewing over shredded fabric without reinforcing it first
- relying on glue or seam tape for a seam that needs structure
- leaving loose threads that keep fraying
- choosing a neat-looking stitch that is too light for the job
- testing the bag with a full load before checking the repair
One more mistake I see often: people repair only the visible split and ignore why it failed. If the seam blew out because the bag is routinely overpacked, the repair may fail again unless you change how the bag is used.
Test the Repair Before Using the Backpack Normally
Do not go straight from the repair table to a full school or travel load.
Use this pass/fail checklist:
Pass if:
– the seam stays closed while the bag is lightly loaded
– there are no new gaps, popped stitches, or spreading frays
– the fabric around the repair lies flat without puckering
– the repair feels secure when you lift the bag by hand
– the seam does not shift when you carry it for a short test walk
Fail if:
– the seam opens again under a small load
– the stitches pull through the fabric
– fraying continues beyond the repaired area
– the bag shape distorts around the repair
– the repair area feels soft, loose, or unstable
Start with a few light items first. Carry the bag around the house for a few minutes. Check the repaired seam for puckering, gaps, or new fraying. Increase the load gradually over the next few uses.
If the seam starts opening again, stop using the bag for heavy items. A repair that holds empty but fails under normal weight is not ready for daily use.
When to See a Luggage Repair Specialist
Get professional help if:
– the seam is part of a strap anchor or top handle
– the surrounding fabric is badly torn or thin
– the bag has already failed under heavy load
– the repair area is too tight to stitch cleanly
– the backpack is expensive enough that a proper repair is worth more than a guess
Dry-bag and waterproof backpack repairs can sometimes be fixed, but they are less forgiving because the seam has to hold water resistance as well as structure. If that matters to you, a specialist may save you from turning a small repair into a larger problem.
Practical Examples of Backpack Seam Repairs
Small side seam on a polyester school backpack
This is usually a good hand-sewing job. Trim the loose threads, align the seam, and use a backstitch. If the fabric is still firm, you may not need a patch.
Frayed seam on a nylon daypack
Nylon can fray quickly, so clean up the loose threads first and avoid pulling on the opening. If the edge looks weak, add an inside patch before stitching.
Ripstop seam that started opening after overpacking
Ripstop can stop small tears from spreading better than plain weave fabric, but once a seam starts to fail, the stitch line still needs repair. Reinforce the repair so the opening does not creep farther along the seam.
Seam near a strap attachment
This is the one I treat most cautiously. If the tear is small and the surrounding fabric is strong, a reinforced repair may work. If the fabric is distorted or the strap has started pulling away, send it to a repair shop instead of trusting a quick fix.
For more care guidance after the repair, you may also find how often you should clean a backpack useful, since grime and grit can accelerate wear around seams.
A backpack seam repair is really a judgment call: close the opening, but also restore enough strength that the bag can do its job without tearing again. When you match the method to the stress level, the repair has a much better chance of becoming a real fix instead of a temporary patch.