
Why Are My Suitcase Wheels Not Rolling? A Practical Fix-It Guide

If your suitcase suddenly feels like it’s fighting you, the problem is usually not mysterious. In my repair work, I most often find one of three things: debris packed into the wheel, hair or thread wrapped around the axle, or a wheel assembly that has worn out or taken a hit. The good news is that many wheel problems are fixable at home if you diagnose them in the right order.
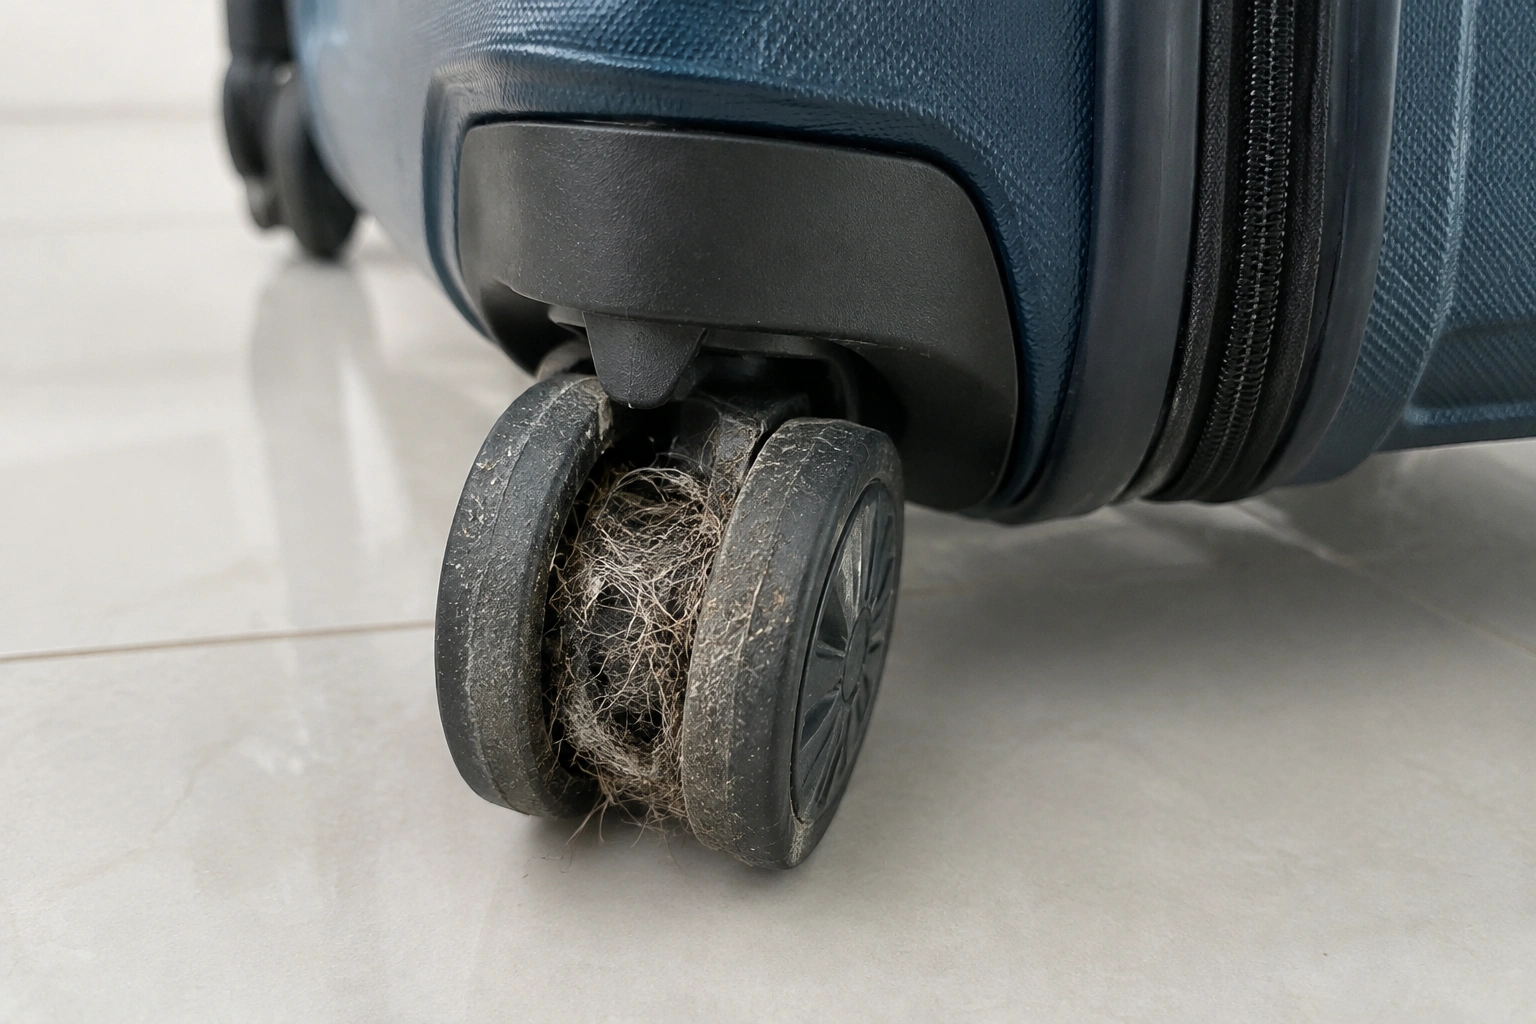
Before you start, check whether the wheel can be cleaned in place or whether you need to remove a cover or wheel assembly to reach the problem area. Access varies by suitcase design: some spinner wheels and inline wheels expose the wheel path easily, while others hide the fasteners or bearings behind a cover. The key is not to guess. A wheel that squeaks, drags, or refuses to spin freely can look “fine” from the outside while the real issue is hiding in the housing or around the axle. That’s why a methodical check saves time and prevents damage.
Why Suitcase Wheels Stop Rolling
A suitcase wheel usually stops rolling because something is blocking movement or because a part has worn, bent, or cracked.
Here’s the practical breakdown:
- Debris in the wheel path: Grit, sand, tiny stones, or dried mud can jam the wheel or housing.
- Hair and thread wrapped around the axle: This is especially common on spinner wheels and around exposed wheel stems.
- Dry or worn bearings: The wheel may still turn, but it feels gritty, noisy, or stiff.
- Bent axle or damaged mounting: The wheel may wobble, scrape, or sit at an angle.
- Cracked wheel housing: Even if the wheel itself looks intact, the frame around it may be broken.
- Impact damage: A hard drop, curb strike, or baggage-handler hit can shift parts out of alignment.
One important trade-off: a wheel that only looks dirty may be repairable in minutes, while a wheel that is loose or grinding internally may need replacement. Cleaning a broken assembly won’t bring it back.
If you want a broader maintenance reference for bags and gear, our backpack cleaning guide covers the same “clean first, inspect second” mindset that helps prevent avoidable wear.
What You Need Before You Start
You do not need a workshop, but a few simple tools make the job much easier:
- A flashlight or phone light
- Tweezers or small needle-nose pliers
- Small scissors or a seam ripper for cutting wrapped hair
- A soft brush or old toothbrush
- Mild soap and water
- A dry cloth or paper towel
- Silicone spray if lubrication is appropriate
- A toothpick or wooden skewer for stubborn packed debris
A few cautions matter here. Avoid metal tools that can gouge the wheel surface or nick the axle. Keep water use modest; you want to clean the assembly, not soak it. If the suitcase is under warranty, check the manufacturer’s support page before opening anything that might affect coverage.
Check the Wheel Type First: Spinner vs. Inline Wheels
Suitcase troubleshooting changes depending on the wheel style.
| Wheel type | What usually goes wrong | What to inspect first | Typical fix |
|---|---|---|---|
| Spinner wheels | Hair, thread, grit, housing damage, loose stems | The wheel perimeter, stem, and housing | Clean debris, inspect for wobble, then lubricate only if needed |
| Inline wheels | Flat spots, axle wear, scraping from impact, bearing wear | The axle, wheel sidewalls, and mounting points | Check for looseness, cracks, and internal wear |
Spinner wheels rotate in multiple directions, so they tend to collect debris around the stem and inside the housing. Inline wheels usually have a simpler path, but they can show wear through wobble, scraping, or a wheel that no longer tracks straight.
If your bag has two large inline wheels, don’t waste time checking the same exposed spinner-style stem area you’d inspect on a four-wheel spinner. The failure pattern is different, so the inspection should be too.
Inspect the Wheel, Axle, and Housing
This is the step that tells you whether you’re dealing with a clog or a real mechanical problem.
Turn the suitcase over and look closely at the problem wheel. Then check four things:
1) Spin the wheel by hand
A healthy wheel should move with minimal resistance. If it stops quickly, feels rough, or makes a grinding sound, something inside may be worn or blocked.
2) Look for side-to-side play
Gently wiggle the wheel. A little movement is normal on some designs, but obvious looseness usually points to a worn axle, loose fastener, or damaged mount.
3) Check for scraping
If the wheel rubs against the frame or housing, the assembly may be bent or misaligned. That’s not a cleaning issue.
4) Inspect the housing and rim
Cracks, chips, or missing chunks are red flags. If the housing is broken, the wheel may never roll correctly again without a replacement part.
A wheel that is merely dirty often feels stiff but still has a normal shape and sits squarely in the housing. A damaged wheel usually gives itself away with wobble, scraping, or a crooked stance.
Remove Hair, Thread, Dirt, and Packed Debris
This is the most common fix, and it’s worth doing carefully.
- Brush off loose dirt first. Use a dry brush or cloth to remove grit from the outside of the wheel and housing.
- Cut away wrapped hair or thread. Slide a small scissor tip or seam ripper under the strands and snip them in sections. Pull gently with tweezers.
- Work debris out of the gaps. Use a toothpick or wooden skewer to lift packed dirt from the edges of the wheel and around the axle.
- Rotate the wheel as you clean. A wheel that moves a little may expose hidden debris as you turn it.
- Repeat until the wheel spins more freely. One pass is often not enough if the luggage has been through wet sidewalks, station floors, or dusty streets.
Be patient here. Forcing the wheel can bend the axle or crack the housing. I’ve seen plenty of bags where the real damage started after someone tried to “test” a jammed wheel by yanking it harder.
Clean and Dry the Wheel Assembly Properly
Once the visible debris is out, clean the assembly lightly.
Use a cloth dampened with mild soap and water to wipe the wheel surface, then wipe again with plain water on a clean cloth if needed. The goal is to remove sticky residue, not leave soap in the wheel path. After that, dry the wheel thoroughly with a towel and let it air-dry before you store or use the suitcase again.
Why drying matters: moisture mixed with dust can turn into a gritty paste, and that paste can make the wheel feel worse than before. If the wheel housing traps water, a quick wipe is not enough. Give it time to dry completely.
When and How to Lubricate Suitcase Wheels
Lubrication helps only after the wheel is clean and dry, and only on designs that are meant to tolerate it. Many luggage wheels use sealed bearings or enclosed assemblies that may not benefit from lubrication at all. If the wheel is sealed, cracked, dirty inside, or already damaged, check the design first rather than spraying it blindly.
A silicone spray can be appropriate for some wheel assemblies, but it is not a universal fix. Apply a small amount only if the wheel design allows access to the moving parts, then spin the wheel to distribute it. Wipe away any excess.
Avoid these common mistakes:
- Heavy grease, which can trap grit
- Over-spraying, which can drip into the housing
- Lubricating a cracked or loose wheel and expecting it to heal
- Using lubricant on a sealed or dirty component without checking how the assembly is built
The trade-off is simple: lubrication can restore smoother movement, but only if friction is the issue. If the wheel is bent, cracked, or internally worn, lubricant may mask the problem for a short time without fixing it.
For general replacement or maintenance guidance, wheel assemblies are often repairable if the rest of the suitcase is still in good shape, but the exact part usually needs to match the model.
How to Tell If the Wheel, Bearings, or Axle Is Worn Out
If cleaning doesn’t solve the problem, inspect for wear.
Look for these signs:
- Gritty feel when spinning: Often points to worn bearings or internal contamination
- Squealing or grinding: Usually means the wheel is rubbing or the bearing surface is failing
- Persistent wobble: Suggests axle or mounting damage
- Wheel sits crooked: Often a bent stem, bent axle, or broken housing
- Wheel still drags after cleaning: Internal damage is likely
At this point, the question is no longer “How do I clean it?” but “Is the part still structurally sound?” A wheel that is cracked or loose enough to shift under load is not just annoying; it can fail again at the worst time, usually when the suitcase is fully packed and rolling over uneven ground.

As a rough repairability guide: a replaceable wheel is usually a wheel that can be removed as a separate part, often with accessible screws, a cover, or a mounting plate. A failed bearing or axle assembly is more likely when the wheel is permanently loose, the axle is bent, the wheel sits crooked, or the housing itself is damaged. In that case, cleaning may help only temporarily, and the whole assembly may need replacement rather than just the wheel surface.
Replacement parts are not universal. The suitcase-repair guide warns that replacement wheels are not one-size-fits-all, so matching the exact model or checking the manufacturer’s parts guidance is often the safest route.
Common Mistakes That Make the Problem Worse
A few habits turn a small repair into a bigger one:
- Forcing a stuck wheel: This can bend the axle or crack the mount
- Lubricating before cleaning: Dirt gets locked in place
- Using harsh solvents: Some plastics and finishes do not tolerate them well
- Ignoring one bad wheel: The suitcase may pull unevenly and stress the other wheels
- Skipping the housing inspection: A broken mount can look like a wheel problem from the outside
If you only remember one rule, make it this: clean first, inspect second, lubricate last.
Quick Temporary Fixes While Traveling
If you’re away from home and the suitcase has to make it through the trip, focus on getting it usable, not perfect.
- Cut away visible hair or thread.
- Knock loose grit out with a toothpick or the edge of a card.
- Wipe the wheel dry after wet sidewalks or rain.
- If one wheel is completely seized, carry the bag on its side or tilt it so the working wheels take the load.
- Use a luggage strap, bungee, or temporary carry strap to support the bag if you need to move it a short distance by hand.
- If the wheel is locked solid and scraping, stop forcing it and drag the bag only as a last resort over the shortest possible distance.
These are short-term fixes. They can get you from the station to the hotel or from the airport to a repair shop, but they do not solve a cracked housing or worn bearing.
DIY Repair, Professional Repair, or Replacement?
Use this decision rule:
DIY cleaning is enough when:
- The wheel is dirty, hairy, or gritty
- It spins better after debris is removed
- There is no visible crack, wobble, or scraping
Professional repair or manufacturer service makes more sense when:
- The wheel housing is cracked
- The axle is bent or the wheel is loose
- The suitcase is under warranty
- Replacement parts are model-specific and hard to source
Replacement of the wheel or suitcase is the better call when:
- The wheel assembly is badly damaged
- The rest of the suitcase is also worn out
- Repair costs are approaching the value of the bag
If the luggage is still in good condition, a damaged wheel can sometimes be replaced rather than retiring the whole bag. That’s the best-case scenario. But if the frame, handle, and zippers are all aging too, a wheel repair may only buy a little time.
When to See a Luggage Repair Specialist
A repair specialist is the right next step when the wheel problem is tied to structural damage, not surface dirt. Bring the suitcase in if:
- The wheel housing is cracked or broken
- The wheel wobbles badly even after cleaning
- The axle looks bent or the wheel sits off-center
- You need a matching replacement part and don’t know the model number
- The bag is under warranty and you want to avoid voiding coverage
A good repair shop can tell you quickly whether the suitcase is worth fixing. That matters because some bags are worth saving with a single wheel replacement, while others are already at the end of their useful life.
Practical Examples of Common Wheel Problems
A spinner suitcase comes back from a rainy city trip and one wheel stops turning. After cleaning out compacted grit and drying the housing, it rolls normally again. That’s a clog, not a failure.
A commuter’s carry-on squeaks and feels gritty even after the outside is wiped clean. The wheel still turns, but not smoothly. That points more toward bearing wear than surface dirt.
A two-wheel suitcase scrapes the frame on one side and pulls unevenly. That usually means the axle or mount is damaged, not just dirty.
A parent notices one wheel is loose and visibly crooked after the bag was dropped. In that case, I would not rely on cleaning alone. The safer move is repair or replacement of the wheel assembly.
Final Check Before You Roll Again
Once the wheel is clean, dry, and tested, roll the suitcase over a flat floor and then over a slightly rougher surface like a hallway seam or sidewalk crack. If it tracks straight and does not grind, you’ve likely solved the immediate problem. If it still drags, the issue is probably inside the wheel assembly, and that’s when repair or replacement becomes the smarter choice.