
How to Fix a Suitcase Handle Without Making the Damage Worse

A suitcase handle usually fails in one of a few ways: it sticks, wobbles, won’t retract, won’t extend, or pulls partly out of the shell. This article covers both the telescoping suitcase handle and the top carry handle, since they fail in different ways and may need different repair paths. The good news is that many of these problems trace back to a small part of the mechanism rather than the whole suitcase. The bad news is that forcing it rarely helps. If the rails are bent, the button is jammed, or the mounting points are loose, pushing harder usually turns a repairable problem into a replacement job.
If you travel often, keep a simple rule in mind: diagnose before you disassemble. That saves time, avoids stripped screws, and keeps you from opening the luggage shell when the issue might be a blocked release button or a loose fastener. For broader luggage maintenance habits, you may also want to keep Queryoro’s backpack and luggage care guides handy, especially if you rotate between a suitcase, commuter bag, and travel backpack.
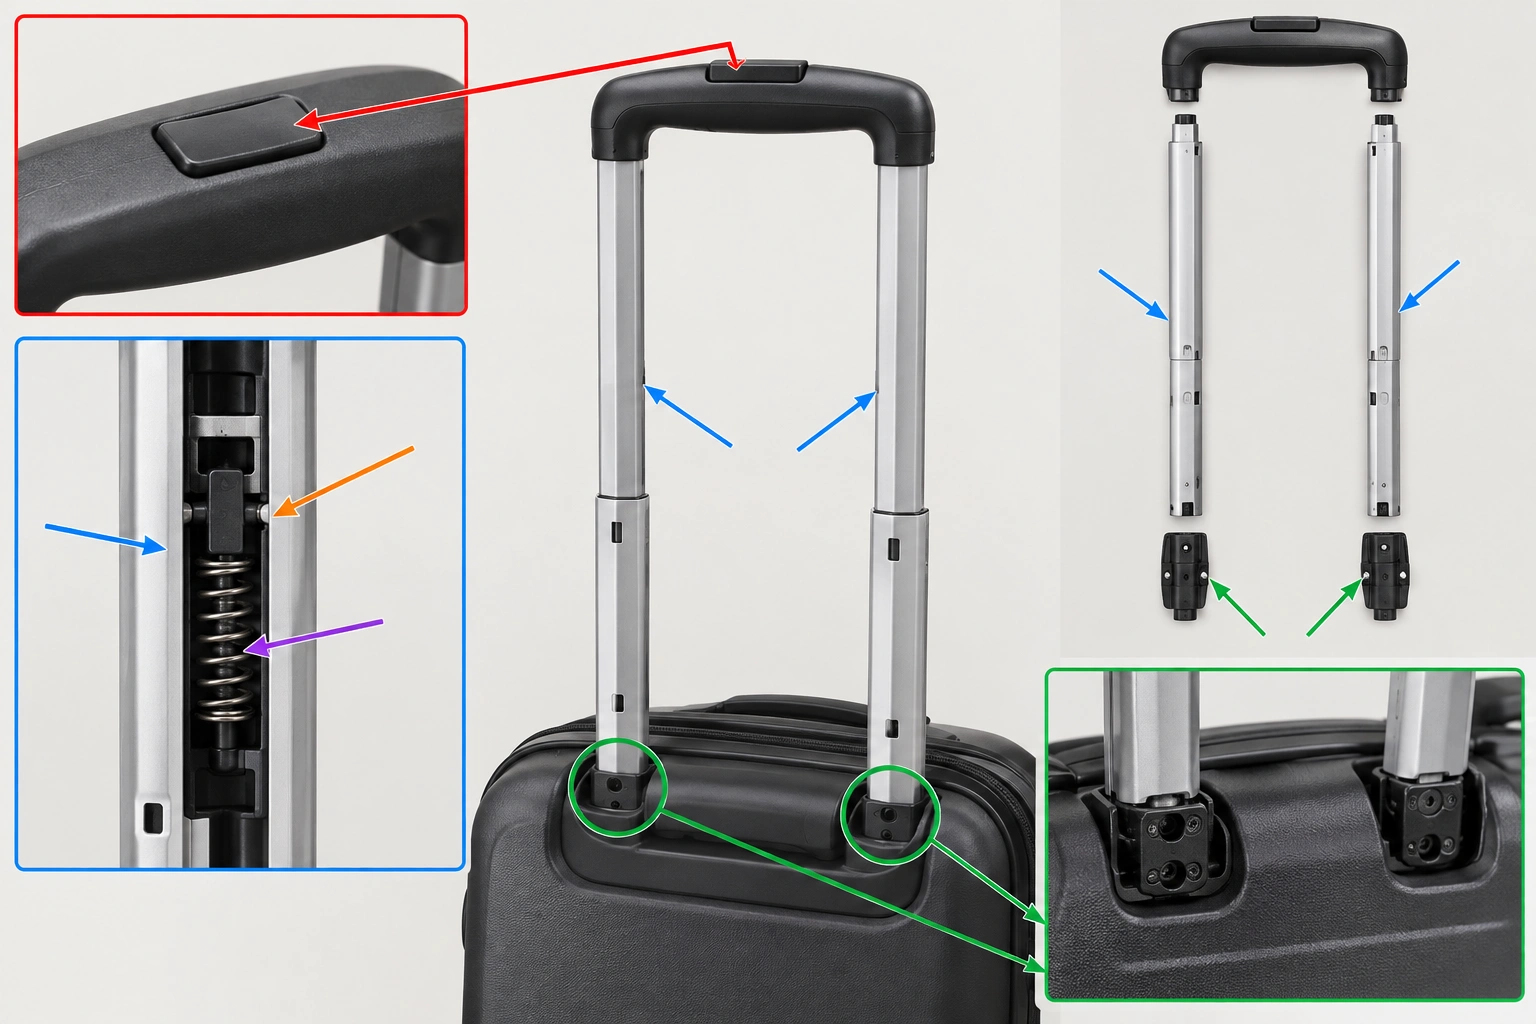
How a Suitcase Handle Works and What Can Fail
Most wheeled suitcases use a telescoping handle. Two metal tubes or rails slide up and down inside guide channels. A release button or trigger retracts small locking pins or rods so the handle can move. When you let go, the pins spring back into place and lock the handle at the chosen height.
That means a “handle problem” may actually be one of several different failures:
- Release button or trigger issue: The button moves, but the handle won’t unlock.
- Spring failure: The button feels dead, mushy, or doesn’t return properly.
- Rail misalignment: One side rises while the other side hangs up.
- Debris in the tubes: Sand, grit, broken plastic, or bent metal obstructs movement.
- Loose screws or rivets: The handle feels wobbly or pulls away from the shell.
- Broken grip or mounting plate: The top carry handle may detach even if the telescoping rails still work.
A useful check: if the handle moves when you press directly on the internal trigger piece, the problem is often the button mechanism rather than the rails themselves.
Before You Start: Safety Checks, Prerequisites, and What You’ll Need
DIY repair makes sense when the damage is limited to a loose fastener, a jammed button, a dirty rail, or a replaceable handle assembly. It is a poor bet when the rail is visibly bent, the shell is cracked around the mounting points, or the handle is pulling away under load.
Gather these diagnostic tools before you open anything:
- Phillips and flathead screwdrivers
- Small Allen key set, if your suitcase uses hex fasteners
- Needle-nose pliers
- Small container for screws and clips
- Flashlight
- Thin brush, wooden stick, or stiff wire for debris removal
- Lubricant only if the mechanism is clear and the manufacturer or repair guide suggests it
If you already know the failed part, you may also need replacement parts such as a spring, button, screws, rivets, or a full handle assembly.
Before ordering replacement parts, document the old assembly first:
- Model number
- Measurements
- Fastener type
- Rail spacing
- Photos of the old assembly from several angles
A note on lubricants: some repair guides suggest WD-40 or a grease-based lubricant after the tubes are clear, while others prefer a lighter spray. On a real suitcase, test cautiously and use the minimum needed; too much lubricant can attract grit. If you’re unsure, cleaning first is safer than flooding the mechanism.
One practical safety rule: if the handle is cracked enough to shift under your hand, stop using the suitcase until it’s repaired. A partially detached handle may still work for light use, but it is unsafe to keep relying on if it moves, flexes, or is getting worse under load.
Diagnose the Handle Problem Before You Open the Shell
Use this quick decision path.
If the handle is stuck and won’t extend
Press the release button and gently lift and lower the handle a few times. Do not yank. If the handle still won’t move, check whether the tubes are blocked by debris or whether one side is misaligned.
If the bag is packed tightly, relieve pressure around the handle channel and test again. That won’t fix a broken part, but it can help if the lining or contents are pressing into the mechanism.
If the handle won’t retract
Look for a bent rail, a jammed button, or something inside the shell pressing against the telescoping channel. A handle that retracts only partway is often being blocked by a misaligned rod or a foreign object in the tube.
If the handle feels loose or wobbly
Check the mounting points first. Loose screws are a common cause, and they’re the easiest repair. If the handle rocks side to side, the fasteners may be backing out, the internal plate may be cracked, or a rivet may have failed.
If the handle is detached or partly pulled out
This usually means the mounting hardware has failed. In many cases, the suitcase must be opened from the inside to reach the bolts or screws that hold the telescoping assembly in place. Some luggage uses hidden rivets, tamper-resistant fasteners, or a sealed handle module, which can make home repair impractical without drilling or specialized tools.
How to Open the Handle Housing Safely
Many suitcase handles hide their fasteners under trim, lining, or fabric panels. Work slowly so you can put everything back the same way.
- Empty the suitcase. Remove anything that could press on the lining or block access.
- Find the interior panel near the handle. On hard-shell luggage, this may be a zippered lining or a fabric cover. On soft-sided bags, it may be a stitched or clipped panel.
- Photograph the layout before removing parts. Take a few close-up photos of screw locations and the direction of any rods or brackets.
- Remove screws carefully. Use the correct screwdriver size so you don’t strip the heads.
- Lift the lining or cover gently. Don’t rip adhesive or tear fabric unless replacement trim is already part of the repair plan.
- Keep track of clips, washers, and brackets. Small parts disappear easily, and missing hardware can make the handle unstable.
If you uncover sharp edges or spring-loaded pieces, pause and work with the suitcase on a stable surface. The goal is access, not speed.
Fix Common Suitcase Handle Problems
1) Tighten loose screws or hardware
If the handle is only wobbly, tighten the mounting screws first.
- Tighten each screw a little at a time.
- Alternate sides so the handle seats evenly.
- Stop when the handle is snug; over-tightening can crack plastic mounts or strip threads.
If the screw spins without biting, the hole may be stripped. In that case, a slightly larger screw, a threaded insert, or a full mounting repair may be needed rather than more torque.
2) Clear debris from the telescoping tubes
If the handle sticks or binds, inspect the rails and channels.
- Press the release mechanism.
- Look for grit, broken plastic, bent metal, or a lodged object.
- Remove debris with a thin stick or wire, working gently so you don’t scratch the rail or push dirt deeper inside.
- Wipe the visible sections clean before testing again.
If the tubes are clear, a small amount of lubricant may help, but only after the obstruction is gone. Lubricant is not a substitute for clearing a jam.
3) Reposition a misaligned rod or rail
Sometimes one side of the handle rises while the other side drags. That usually means the rods inside the handle are not seated correctly.
- Remove the handle top if needed.
- Check whether both rods sit in their matching holes or guides.
- Reposition them so the mechanism moves evenly.
- Test extension and retraction before reassembling fully.
This is one of those fixes that looks minor but matters a lot. If one side is off by even a little, the handle can bind every time you load it.
4) Replace a broken button or spring
If the button feels dead or won’t return, the spring or trigger may have failed.
- Open the handle housing.
- Compare the working side with the broken side if the mechanism is symmetrical.
- Replace the spring or button only if the part is available and clearly matches the original shape and size.
- Reassemble carefully and test the action several times.
This is where compatibility matters. Handle assemblies are often model-specific, and even a small mismatch can leave the button sitting too high, too low, or out of alignment.
5) Reattach a detached handle
If the grip or telescoping handle has come away from the shell, the repair is usually mechanical, not cosmetic.
- Open the suitcase and expose the mounting points.
- Line up the handle assembly with the original bolt holes.
- Install the correct screws or bolts first by hand.
- Tighten evenly.
- Confirm that the handle sits straight before closing the lining.
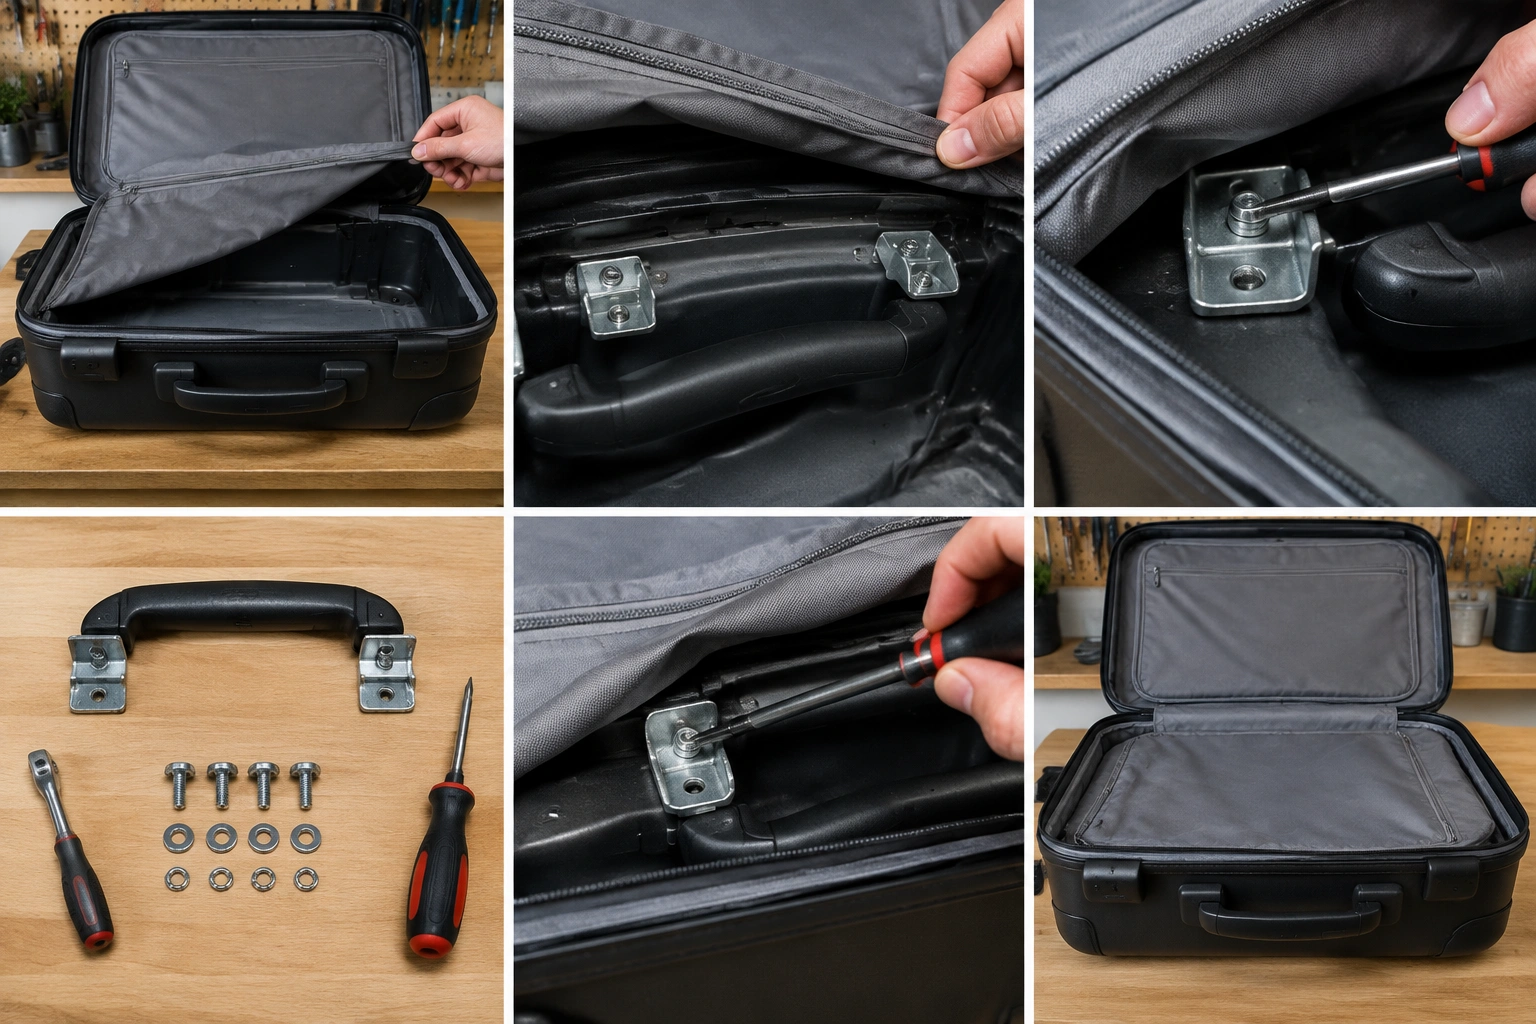
If the original attachment used rivets, replacing them with screws may be possible in some cases, but that changes the repair method. Screws are easier to service later; rivets can be strong but are less convenient for future access. Choose the fastener that matches the design and load, not just the one that is easiest to install.
Repair a Part or Replace the Whole Handle Assembly?
Here’s a practical way to decide:
| Damage type | Best path | Difficulty | Typical tools | Trade-off |
|---|---|---|---|---|
| Loose screws or minor misalignment | Tighten or realign | Low | Screwdriver, Allen key | Fast and inexpensive, but only works if the structure is intact |
| Debris or light jam | Clean and test | Low | Brush, stick, flashlight | Good first step, but not a fix for broken parts |
| Broken button or spring | Replace part if available | Medium | Screwdrivers, small pliers | Cheaper than full replacement, but parts must match |
| Detached handle with intact rails | Reattach hardware | Medium | Screwdriver set, pliers | Durable if mounting points are sound |
| Bent rail, cracked mount, or failed internal frame | Replace full assembly | Medium to high | Depends on model | More work upfront, but usually more reliable than patching a structural failure |
| Unknown model or unavailable parts | Professional repair or replacement suitcase | Varies | Varies | Avoids wasting time on incompatible parts |
A simple rule of thumb: if the repair would cost close to the value of the suitcase, or if you cannot confirm a matching part, replacement is usually the better option. That is especially true when the handle is structural, the shell is damaged, or the part is hard to source.
How to Reassemble and Test the Repair
Reassembly is where many repairs succeed or fail.
- Put every bracket, washer, and screw back in its original position.
- Tighten fasteners evenly.
- Reattach the lining or access panel without pinching cables, rods, or fabric.
- Test the handle at least several times in a row.
- Check three things: extension, retraction, and locking at each height.
The handle should rise smoothly, lock cleanly, and retract without dragging. If it catches only at one height, a rod may still be misaligned or a screw may be pinching the assembly.
For a final check, lift the suitcase by the handle while the case is empty. Then repeat with a modest load. If the handle flexes, shifts, or clicks under weight, stop and inspect the mounting points again before traveling with it.
Common Mistakes to Avoid
The most common repair mistakes are the ones that create a second problem:
- Forcing a stuck handle and bending the rails
- Using the wrong screwdriver and stripping screw heads
- Opening the shell without tracking where the fasteners came from
- Using glue where the handle needs a load-bearing mechanical fastener
- Buying a replacement assembly without confirming the model and rail spacing
- Continuing to use a handle that is already pulling away from the shell
A handle repair should feel solid, not “good enough for one more trip.” If it’s carrying the weight of a packed suitcase, the mounting points need to be trustworthy.
How to Find Compatible Replacement Parts
Before ordering anything, match the suitcase model and inspect the old assembly closely.
Start with the most reliable sources first:
- Manufacturer support or parts pages
- Luggage repair shops
- Part-number and measurement matching
- Marketplace searching only after you know the exact specs
Check:
- Brand and model name
- Handle width and rail spacing
- Mounting style: screws, bolts, or rivets
- Button shape and position
- Length of the telescoping rails
- Whether the grip is a separate part or part of the full assembly
If the original manufacturer offers parts, that is usually the safest route. If not, compare measurements carefully and use photos from the old assembly. A part that looks “close enough” can still sit crooked or fail to lock.
If you’re unsure, the manufacturer’s support page or a luggage repair specialist is usually a better source than guessing from a generic listing. For travel brands with repair programs, examples like Samsonite’s support pages and Tumi’s service information show the kind of compatibility guidance that may be easier to verify than a marketplace listing.
When to See a Luggage Repair Specialist
Choose professional help when:
- The handle is cracked at the mounting point
- The rail is bent enough that it won’t slide straight
- The suitcase shell is damaged around the handle opening
- The fasteners are riveted in a way that requires specialized tools
- The replacement part is model-specific and hard to source
- You’ve already opened the case and the internal frame looks damaged
If the repair estimate is likely to approach the value of the suitcase, replacement is often the better choice. That also applies when parts are unavailable or the handle failure is tied to a damaged shell or frame rather than a simple mechanism issue.
For travelers who want a broader gear-care reference, REI’s repair and care resources are also useful for understanding when a fix is reasonable and when a product is beyond practical repair.
Practical Examples of Common Handle Repairs
A commuter’s rolling bag won’t retract all the way. After opening the lining, a small piece of plastic is lodged in the rail channel. Cleaning the tube and realigning the rod restores normal movement.
A parent’s suitcase handle feels loose after a flight. The fix is simply tightening two internal screws that backed out over time. The handle becomes stable again without replacing the assembly.
An older suitcase handle pops up but won’t lock. The button spring has failed, and the handle only works if the button is held manually. At that point, a replacement button or full handle assembly is the sensible repair.
A handle has pulled partly out of the shell. The rails are still straight, but the mounting plate is no longer secure. Reattaching it with the proper hardware works if the mounting points are intact; if the shell is cracked, the repair is not likely to last.
Final Check Before You Travel
Once the handle works, test it like you’ll actually use it: empty, partially loaded, then packed. Watch for wobble, sticking, and uneven extension. A repair only counts if the handle behaves normally under real use, not just when the suitcase is sitting open on the floor.
If you keep your luggage in service long enough, handle repairs become part of normal ownership. The key is knowing when to clean, when to tighten, when to replace a part, and when to stop before the suitcase becomes unreliable.