
How to Fix Luggage Wheels: A Practical Repair Guide for Stuck, Wobbly, or Broken Suitcase Wheels

A bad wheel can ruin a good bag fast. One side drags, the suitcase leans, and every hallway tile sounds louder than it should. The good news is that many luggage wheel problems are simple enough to diagnose at home, and some only need cleaning or a snug screw.
This guide walks through the repair decision the same way I would in a shop: identify the symptom, inspect the hardware, then choose the least invasive fix that actually solves the problem. That matters because a wheel that only needs debris removed should not be treated like a full replacement job, but a cracked wheel or bent axle will not come back to life with lubricant.
If you want more care guides like this, you can also browse Queryoro’s backpack and luggage care articles.
Quick diagnosis: what’s actually wrong with the wheel?
Before you buy parts, figure out what the wheel is doing.
Pre-removal checklist
– Identify the fastener type first: screw, nut, clip, or rivet.
– Check whether the problem seems to be in the wheel itself, the axle, the bearing, or the housing.
– Look for cracks, wobble, grinding, or rubbing before you start taking hardware apart.
– If the bag is under warranty, check the manufacturer’s service options before disassembly.
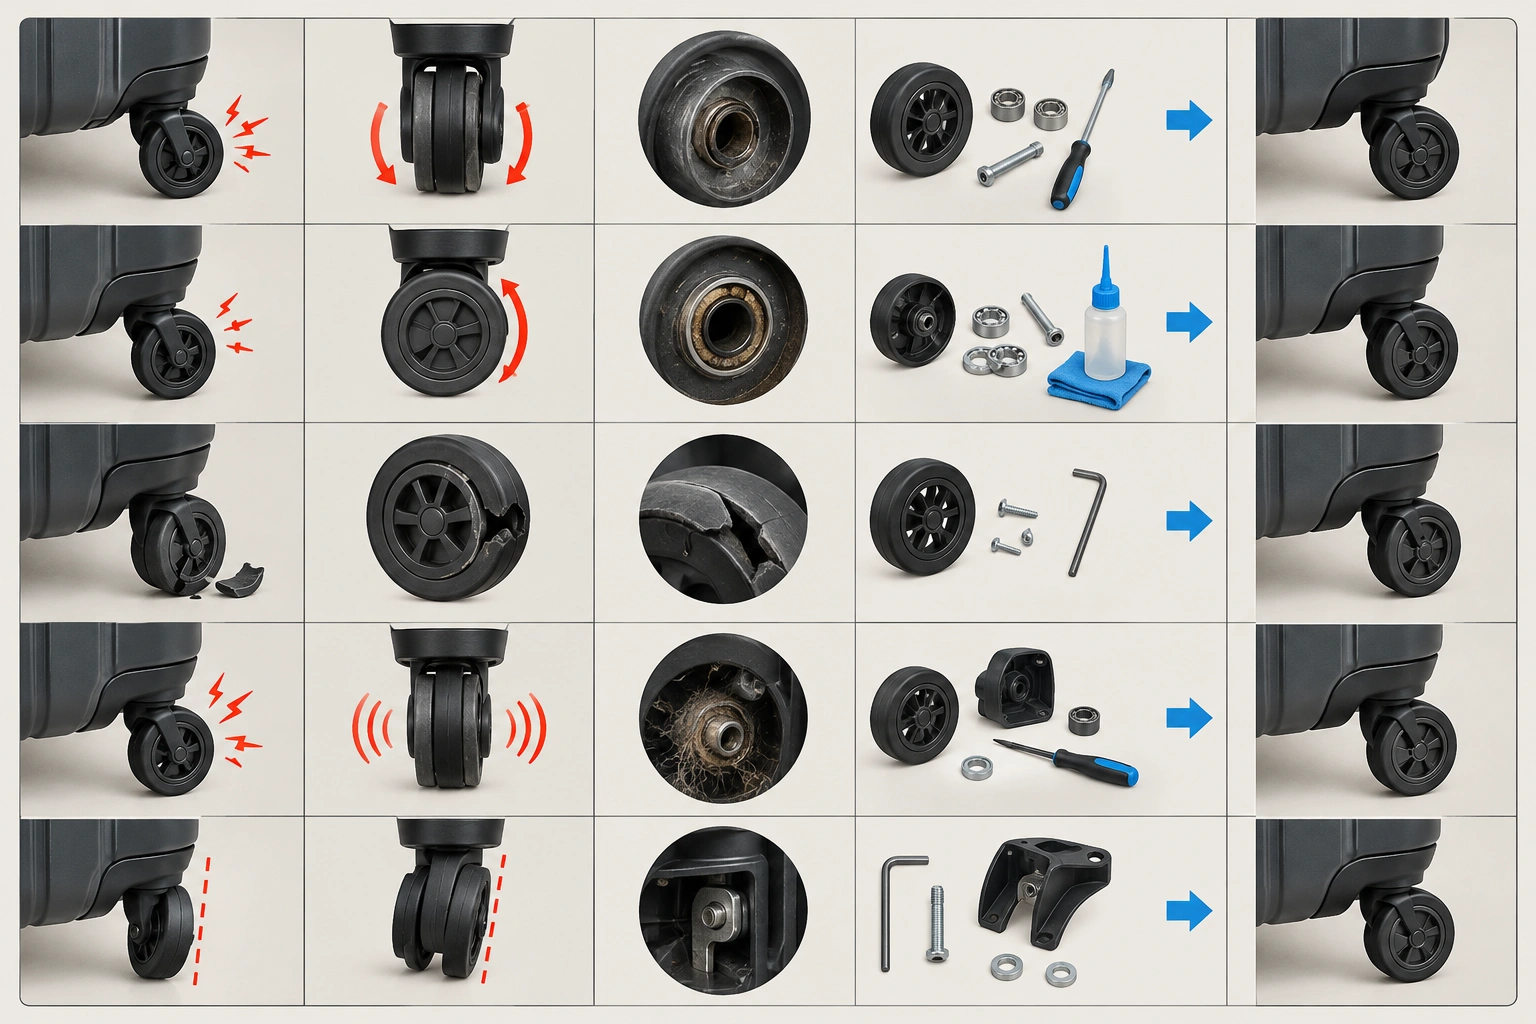
| Symptom | Likely cause | Best first fix | When replacement is more likely |
|---|---|---|---|
| Wheel won’t spin freely | Dirt, hair, grit, dry bearing, bent axle | Clean and inspect | If the bearing is rough or the wheel is cracked |
| Wheel wobbles | Loose screws, worn mount, worn bearing | Tighten fasteners | If the housing is cracked or the axle is bent |
| Wheel is noisy | Debris, dry contact points, worn bearing | Clean and lightly lubricate | If noise stays after cleaning |
| Wheel drags or rubs | Misalignment, bent hardware, damaged wheel edge | Check alignment and screws | If the wheel is flat-spotted or warped |
| Wheel is cracked | Impact damage, age, brittle plastic | Replace wheel | Usually not worth repairing |
| Wheel is detached | Missing hardware, broken axle, failed mount | Inspect mount and replace parts | If the wheel well or shell is damaged too |
A wheel that feels sticky in one spot but smooth in another usually points to debris or a failing bearing. A wheel that flops side to side usually points to looseness in the hardware. A wheel that is physically split, missing pieces, or hanging off the bag usually needs replacement rather than cleanup.
Travelpro’s repair guide suggests buying replacement wheels directly from the suitcase manufacturer in some cases, which is useful brand-specific advice rather than a universal rule. It also notes that on some bags you can unzip the lining to expose the nut bolts that hold the wheel screws in place. That is a useful reminder that the repair path depends on the bag design, not just the symptom. You can find that guidance on Travelpro’s luggage repair page.
Can you fix it yourself, or is replacement the better call?
A simple rule helps here: if the wheel is dirty, loose, or lightly stiff, try repair first. If it is cracked, bent, missing pieces, or still rough after cleaning, plan on replacement.
Use this decision path:
– Replace just the wheel if the tread is cracked, flat-spotted, or worn out, but the axle and housing are still straight and solid.
– Replace the axle or bearing if the wheel itself looks fine but spins poorly, grinds, or wobbles because the support hardware is worn.
– Replace the whole assembly if the mount, housing, or surrounding shell is cracked, distorted, or part of a molded unit that no longer holds alignment.
DIY makes sense when:
– the wheel is screwed on or otherwise accessible
– the wheel housing is intact
– the problem is debris, looseness, or a worn wheel
– you can match the part size and mount pattern
A repair shop or warranty service makes more sense when:
– the wheel is riveted and you do not want to drill hardware out
– the shell around the mount is cracked
– the wheel assembly is integrated into a larger molded unit
– the bag is still under warranty and the brand offers parts or service
That trade-off is mostly about risk. A basic screw-on wheel can often be swapped without much drama. A riveted assembly may be repairable, but the chance of damaging the shell is higher if you are not set up for it. If the bag is a warranty-covered piece, check the brand’s service path before taking a drill to it.
Tools, materials, and parts you may need
You do not need a full workshop for many luggage wheel repairs. Emaybag notes that common jobs often call for basic hand tools such as Phillips and flathead screwdrivers, an adjustable wrench or small spanner, pliers, and a tape measure or ruler. That lines up with the repairs I see most often.
Useful tools and supplies:
– Phillips screwdriver
– Flathead screwdriver
– Torx driver, if your bag uses Torx fasteners
– Hex key or Allen wrench, if applicable
– Adjustable wrench or small spanner
– Pliers
– Tape measure or ruler
– Mild soap and warm water
– Soft brush or old toothbrush
– Lubricant suitable for small moving parts
– Threadlocker for screws that tend to back out
A few cautions matter here. Use the right driver size so you do not strip the screw head. If a screw is already soft or damaged, stop and switch tools before forcing it. And if you use threadlocker during reassembly, use it sparingly; you want the hardware to stay put, not become impossible to service later.
Identify your wheel type and mounting style
This step saves the most mistakes.
Spinner wheels vs. inline-style wheels
Spinner wheels usually rotate in multiple directions and are common on modern four-wheel luggage. They are great for rolling beside you in tight spaces, but they have more moving parts.
Inline-style wheels, often seen on older two-wheel luggage, are fixed in a forward-back orientation. They are simpler and can feel sturdier under rough use, but they are not as maneuverable in tight aisles or train stations.
If you buy the wrong style, the wheel may fit poorly or track badly. The bag may still roll, but it will not roll correctly.
Screwed, bolted, or riveted mounts
Screwed or bolted assemblies are easier to service because the wheel can usually be removed with hand tools. Travelpro’s guide describes accessing the wheel hardware by opening the lining and using a wrench plus screwdriver to remove the screws.
Riveted assemblies are more secure in some designs, but they are harder to service because removal may require drilling out the rivet. That is where people get into trouble by cracking plastic or enlarging the hole.
If you are not sure which you have, look for:
– visible screw heads on the wheel housing
– a nut on the inside of the lining
– a smooth metal head with no driver slot, which may indicate a rivet
Measure before you buy anything
This is the part that prevents wasted parts orders.
Measure:
– wheel diameter
– wheel width
– axle diameter
– screw spacing or hole pattern
– overall housing size
If you are replacing a complete assembly, compare the mount shape as well, not just the wheel itself. A wheel can look close in photos and still sit too high, too low, or too far off-center.
For example, a wheel that is 2 mm wider than the original may still fit physically, but it can rub the housing or change the suitcase’s tracking. That is why matching the mount pattern matters as much as matching the wheel size.
If the old wheel is still on the bag, take photos before removing it. One close-up of the hardware and one straight-on shot with a ruler beside it can save a lot of guesswork. It also helps to compare the old wheel to product photos or model numbers before ordering so you do not end up with the wrong mount or tread style.
Inspect the wheel assembly for the real cause
A wheel problem is not always a wheel problem.
Check these points:
– the wheel tread for cracks, flat spots, or missing chunks
– the axle for bending or looseness
– the bearing for roughness or grinding
– the housing for cracks or warping
– the screws or bolts for looseness
– the surrounding shell for stress marks
A wheel can feel bad because hair and grit are wrapped around the axle, or because the bearing has worn out, or because the mount itself has shifted. If the wheel spins freely in your hand but binds when installed, the housing may be pinching it.
Delsey recommends using a soft brush or old toothbrush to remove dirt, sand, or hair from the wheel and wheel housing, then cleaning with mild soap and warm water, avoiding soaking, and drying thoroughly. That is a sensible first pass before you replace anything. You can see that maintenance approach on Delsey’s spinner wheel care guide.
How to remove a luggage wheel safely
The exact method varies by suitcase, but the goal is the same: remove the wheel without stripping hardware or cracking the shell.
Before you start, confirm whether you are dealing with a screw, nut, clip, or rivet so you use the right removal method.
- Lay the suitcase flat so the wheel area is stable.
- Open the inner lining or access panel if your bag has one.
- Look for screws, nuts, clips, or rivets that secure the wheel.
- Hold the nut or opposite fastener steady with the correct wrench if needed.
- Back out the screw slowly with the right driver.
- Keep pressure straight on the screw head so you do not cam out and strip it.
- If the wheel is clipped into place, release the clip gently rather than prying hard.
- Lift the wheel out and compare the old part with the replacement before installing anything.
If the bag is hard-shell, pay extra attention to stress around the screw holes because the shell can crack or whiten if you force the hardware. On soft-sided luggage, the lining may hide the hardware, so work slowly and keep track of washers and spacers. Soft-sided bags also make access easier in some designs, but the fabric and lining can snag or conceal parts, so take your time.
How to clean, tighten, or lubricate a minor wheel problem
If the wheel is only dirty or slightly loose, this is often enough.
Clean first
Remove visible debris with a brush or toothbrush. Hair and grit love to pack into the axle area and the wheel housing. Wipe the area with a damp cloth and mild soap solution, then dry it fully.

Tighten next
If the wheel wobbles, check every fastener in the housing. Voyage Luggage notes that even a small amount of looseness can create wobble, and it recommends tightening screws until snug, not forced. That is the right mindset. Tight enough to stop movement, not so tight that you strip the screw or crack the plastic.
Lubricate last
A small amount of lubricant can help a dry wheel or bearing move more smoothly. Use it only after cleaning. Lubrication can improve movement, but it will not fix a cracked wheel, a bent axle, or a bearing that has already failed.
If the wheel still grinds or catches after cleaning and a careful tighten, stop treating it as a maintenance issue. At that point, you are probably looking at a worn part.
How to replace a damaged wheel, axle, or full assembly
When the wheel is cracked or the bearing is gone, replacement is the real fix.
Use this replacement guide:
– Replace just the wheel when the wheel tread is damaged but the axle, bearing, and housing are still sound.
– Replace the axle or bearing when the wheel is intact but spin quality is poor, there is grinding, or the support hardware is visibly worn.
– Replace the whole assembly when the housing is cracked, the mount is distorted, or the wheel and support parts are worn together.
- Remove the old wheel assembly using the method that matches your bag.
- Compare the old part to the new one before installing.
- Make sure the wheel diameter, mount shape, and screw pattern match.
- Position the new wheel in the housing.
- Insert screws or bolts loosely at first so the holes can align.
- Once all fasteners are started, tighten them evenly.
- Check that the wheel spins freely and does not rub.
- Reinstall the lining or access panel.
- Roll the suitcase on a flat surface and test both straight tracking and turning.
If the wheel mount is intact but the wheel itself is damaged, you may only need the wheel or axle. If the housing is broken, a full assembly is usually the better route. That is especially true when the old parts have wear on more than one contact point.
Riveted vs. screwed assemblies: what changes in the repair
Screwed assemblies are friendlier to home repair. You can remove them, inspect them, and reinstall them with ordinary tools.
Riveted assemblies are more secure in some luggage designs, but they usually raise the difficulty level. If a rivet must be drilled out, you need a steady hand and the right bit size. Go too aggressively and you can enlarge the hole or damage the shell around it.
That is the trade-off:
– screwed mount: easier to service, easier to inspect, easier to replace
– riveted mount: more involved, less convenient for DIY, sometimes better left to a shop
If your bag uses a riveted setup and the luggage is expensive, under warranty, or structurally stressed, a repair specialist is often the safer choice.
Practical examples of common wheel repairs
A stuck spinner wheel packed with hair and grit usually needs cleaning first. I would brush out the housing, wipe it clean, dry it, and test it before ordering parts.
A wobbly wheel on a carry-on often turns out to be a loose screw or nut. Tightening the hardware may solve it if the mount is still solid. If the wobble remains, the bearing or housing may be worn.
A cracked hard-shell wheel with an intact mount usually calls for a replacement wheel or assembly. Lubricant will not help a split tread.
A detached wheel on a soft-sided suitcase is the one I inspect most carefully. The wheel may be gone, but the real issue could be a bent axle or damaged mount inside the lining. If you replace only the visible wheel and ignore the mount, the failure often comes back.
Temporary travel fixes when you need the bag to roll now
Sometimes you need the suitcase to make it through one trip before the proper part arrives.
Safe short-term options:
– remove packed debris from the wheel
– tighten any obvious loose hardware
– avoid loading the bag beyond what you need for the trip
– roll the suitcase slowly and avoid curbs or stairs when possible
A temporary fix should reduce strain, not hide a dangerous failure. If the wheel is hanging loose, cracking further, or dragging hard enough to tip the bag, do not keep forcing it through the airport. That usually turns a small repair into a larger one.
When to see a luggage repair specialist
If the shell around the wheel is cracked, the mount is torn, or the assembly is riveted and you are not comfortable drilling it out, stop there. The same goes for bags that are still under manufacturer coverage.
A specialist is also worth it when:
– the replacement part is hard to match
– the wheel assembly is integrated into a larger molded unit
– you have already stripped a screw or distorted the housing
– the bag is high-value and you want the repair done cleanly
– the cost of parts plus your time is getting close to the cost of a professional repair or a replacement bag
There is a point where home repair stops being economical. If the part is uncommon and the labor risk is high, a shop can save the shell from further damage. If the luggage is expensive or sentimental, that threshold is usually lower.
How to prevent wheel damage in the future
Wheel care is mostly about reducing shock and keeping hardware tight.
A few habits help:
– clear hair and grit from the wheels after travel
– check loose screws before a long trip
– avoid dragging the bag sideways over curbs
– lift the suitcase over steps instead of forcing the wheels
– store the bag dry so debris and moisture do not sit in the hardware
The wheel is the first part of the suitcase to take abuse, so small maintenance pays off. A quick inspection before a trip can catch a loose screw before it becomes a bigger problem on the road.
FAQs
Can I fix a luggage wheel without replacing it?
Yes, if the problem is dirt, looseness, or light stiffness. If the wheel is cracked, bent, or the bearing is failing, replacement is usually the better fix.
How do I know which replacement wheel to buy?
Match the wheel diameter, axle size, and mount pattern. If possible, compare the old part to the new one before installing it. Manufacturer parts are the safest match when available.
Will tightening the wheel void my warranty?
Not always, but warranty terms vary by brand. If the bag is still covered, check the manufacturer’s service instructions before disassembling anything.
Are spinner wheels harder to repair than inline wheels?
Usually yes, because spinner assemblies have more moving parts and more ways to loosen or wear. Inline wheels are often simpler, but the exact repair still depends on the bag’s hardware.
What if the wheel is fine but still won’t roll?
Inspect the axle, bearing, housing, and mounting screws. The wheel may be fine while the surrounding hardware is bent, loose, or packed with debris.
Is lubrication enough for a noisy wheel?
Sometimes, but only when the noise comes from dryness or minor friction. If the wheel is cracked or the bearing is worn, lubricant is only a short-term improvement.
How long does a repair usually take?
A simple cleaning or screw tightening can be quick. A full replacement takes longer because you need to match the part, remove the old hardware, and test the new assembly. The exact time depends on the bag design.
Should I use glue on a damaged wheel?
Usually not as a real repair. Adhesives may provide a temporary hold in limited situations, but they do not restore a worn bearing, bent axle, or cracked wheel in a reliable way.